• Skip to main content

Digital Dental Photography

Digital Photography and Workflow for Dentists

  • Home
  • Gear
    • Accessories
  • Clinical Dental Photography
    • Basic Settings
    • Patient and Camera Positions
    • Quadrants and Occlusals
    • Extraoral Photos
  • Software
    • Photo Organization
  • Portrait Photography Basics
  • Dental Websites
    • WordPress Websites
  • CE Reviews

Online Photography Tutorials

Photoshop Tip for Dentists – Remove Facial Hair and Skin Blemishes

February 13, 2013 by Charles Payet

While I do not believe it is ethical for dentists to use Adobe Photoshop to alter the appearance of their work, thus deceiving potential patients about what they can really offer, there are certain circumstances under which I believe it is not only acceptable to use Photoshop, but it may be absolutely necessary to do so.  Bear in mind – I NEVER condone the use of Photoshop to actually change anything about the treatment you provided for a patient – but AROUND your work it may be just fine.  In the following video tutorial for dentists on using Photoshop, I will demonstrate 2 techniques that you may find useful, which your patients will love, and which will enhance your photos for marketing purposes.

Use Photoshop to Remove Facial Hair

If you’ve done enough cosmetic dentistry and Before/After portraits, especially of women, you will almost certainly hear one or both of the following comments, which will always start off the same way:  “Of course you can put my portrait on the wall or your website, doctor, as long as you…..

  1. ….just get rid of all those wrinkles!” OR
  2. ….as long as you get rid of those moles/facial hair/sun spots!”

It doesn’t matter if the woman is 26 years old and the only wrinkles are in her imagination, if she sees her photo on your wall, website, Facebook page, etc. and hates it, you will never hear the end of it. Of course you should use a solid Photo Consent Form, but I always let a woman proof her final photo before I print it or put it on the wall; why take a chance?  Guys usually couldn’t care less, and let’s be clear….these tips should only be used for womens’ portraits 99% of the time unless a man specifically requests something.  

Photoshop Elements 11 or Photoshop CS6 ?

The video tutorial to follow is done in Photoshop CS6, and I’ve been using the full version of Photoshop (PS) since version CS2; prior to that, I used Photoshop Elements.  The current version of  Elements (PSE) is version 11, and it is a pretty powerful and very affordable program if you don’t want to spend the money on Photoshop, and you should be able to do these edits in PSE, too.  I just personally prefer the full version.  I find that Photoshop Lightroom (LR) is more intuitive program to learn, as everything is laid out more easily.

How to Reduce or Eliminate Unwanted Facial Hair, Sun Spots, and Moles

There are only 2 tools you will need for this exercise:

  • Duplicate Layer
  • Clone Tool on “Lighten” Mode or “Darken” Mode
 

Watermark Your Photos To Prevent Theft

June 29, 2012 by Charles Payet

In my last blog post about adding copyright information to your dental photos as a way to deter online theft of your work, the tutorial covered how to use a Metadata Template in Adobe Photoshop Lightroom to add identifying information to every photo.  This embedded information can be read by anyone who knows how to look; if they know, they may also know how to remove it (takes a little work), but a thief will probably move on to easier-to-steal photos instead of doing the extra work.  Another step you can take, also easy to do in Lightroom, is to add a Watermark, and that’s what this tutorial will cover.

Why Use a Watermark?

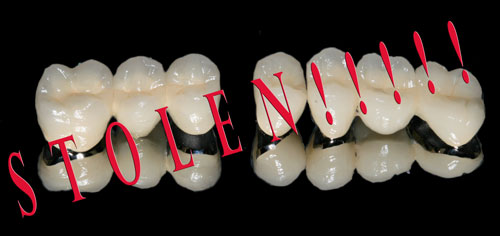
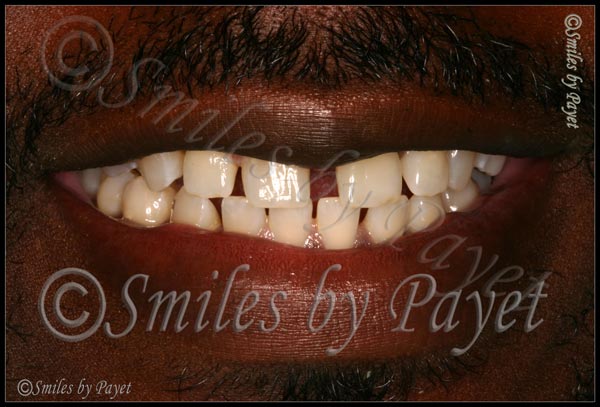
As seen in the example above, a watermark is typically a logo, symbol, or other mark that is placed somewhere on a photos that identifies it as belonging to someone, in this case, anyone seeing this photo knows that “Smiles by Payet” has copyrighted this image.  It’s pretty easy to see, and again, it may act as a deterrent to online theft, because anyone wanting to use it to represent their own work would have to laboriously edit the entire logo out of the photo.  Yes, I overdid it just a teensy little bit to make my point, and no, I would never ruin a photo to this extent with such tasteless work, but you get the point.

The tricky part in using a watermark, as you can probably see, has to do with 3 issues:

  1. Placement
  2. Size
  3. Opacity

While the point of a watermark is to protect your image, the point of your image is to showcase your work to existing or potential patients, with the goal that they will be impressed and call or schedule their treatment with you, not someone else.  Poor placement of a watermark can ruin the whole image and defeat the real purpose of the image, so please…..be tasteful about it.

Watermark Size, Placement, and Opacity

For maximum protection (my opinion only), I recommend creating a very large watermark that can be placed directly across the middle of the photo, but making it highly translucent, thereby not covering up what you want to show.  Doing so makes removal far more difficult for anyone wanting to steal your photo, unless they are highly skilled in Photoshop, and you generally can still see the photo well.

For the most tasteful protection, but the least effective, a small but fully opaque watermark can be placed in a corner.  It’s the least effective simply because it’s the easiest to remove, especially with the “Content-Aware Fill” and “Content-Aware Healing” tools available since Photoshop CS5 and now CS6, but if you don’t like the watermark obscuring the image, it’s still better than nothing.

Personally, I’m still experimenting on my own watermarks, and if you want some of my different tries, check out some photos on both my Charlotte dentist office website and my personal photography website:

Smiles by Payet Dentistry
CDPayet Photography

How to Create a Watermark in Lightroom

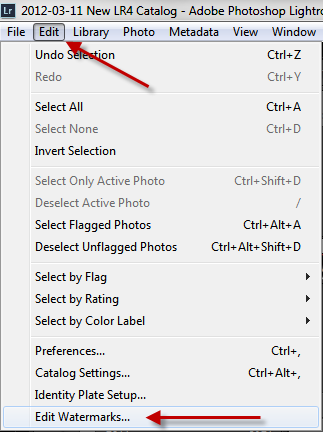
In Lightroom, you can create either a Text or Graphical Watermark; as a general rule, I suggest the Text Watermark for one main reason: it’s a LOT EASIER.  And here’s just how easy it is to create with 2 easy-to-understand screenshots.

Step 1: Go to the Edit option on the top menu, then scroll down to “Edit Watermarks”
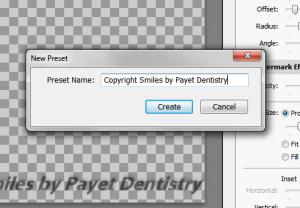


Step 2: At the lower left is where you’ll type in the text for your watermark.  The easiest way to get that (C) symbol is to open MS Word, type in the left parenthesis – capital C – right parenthesis and it will automatically convert it for you.  Then just copy/paste it into the text box.


Step 3: Experiment!  Seriously!  You can see all the options on the right side – play around with them, see what you like, what you don’t like, and as you change things, you’ll see the preview change instantly.  Change the text color – font – size – opacity – placement, etc.

Step 4: Name Your Preset

And you’re done!


Coming up next – how to apply a watermark to your photos during the Export process.


More Info on the Importance of Copyrighting Your Images

June 22, 2012 by Charles Payet

After my recent blog post on why embedding copyright information into your photos is so important, I was doing some additional reading on my Google+ Stream and came across this really useful and important video on why it’s so important to actually copyright your images, as well as how to do it.  I learned a lot and need to take some additional steps myself based on what I learned…..check it out!

I will find more resources on the actual process of submitting your images for copyright protection in the very near future, as I’m learning a lot of valuable information in the process of writing these articles.

Image Copyright Protection

June 13, 2012 by Charles Payet

Ever worry that an unscrupulous web designer, colleague, or ad company might steal your images from your Facebook page, website, or other online source?  If so, read on to learn some easy ways to help protect your work, provide legal coverage if necessary for action, and how to find out if your photos have been stolen.

Has Your Photography Been Stolen Online?

To my knowledge at this time, I’ve never had any of my online photos “stolen,” by which I mean no one has downloaded or “hot-linked” them for use on their on website or in other marketing media.  That’s not to say it hasn’t happened, it just means I’ve never found any examples, because I don’t spend the time searching to find out.
Online Image Protection Has Limits

First off – if someone is REALLY determined to steal your photos, it is virtually impossible to stop it.  Sure, there are ways to add “right-click” protection to stop the easy “save as” copying, and there are ways to hide the image file location to prevent someone using an HTML embed, but in the end, there are far more ways being created on a daily basis to get around them than there are ways to stop them.  If hackers can break into major corporations and government agencies…….well, you get the idea, right?  But since it’s unlikely you’re up against that kind of firepower, mostly you’re looking to keep unethical web designers and colleauges from using your work to advertise themselves.  Fortunately, there are some easy and fast steps to do this with Photoshop Lightroom, and the best part is that, while the initial set-up takes a little time, after that it is virtually automatic and needs no more than a couple mouse-clicks…..seriously!

Creating Copyright Metadata Templates

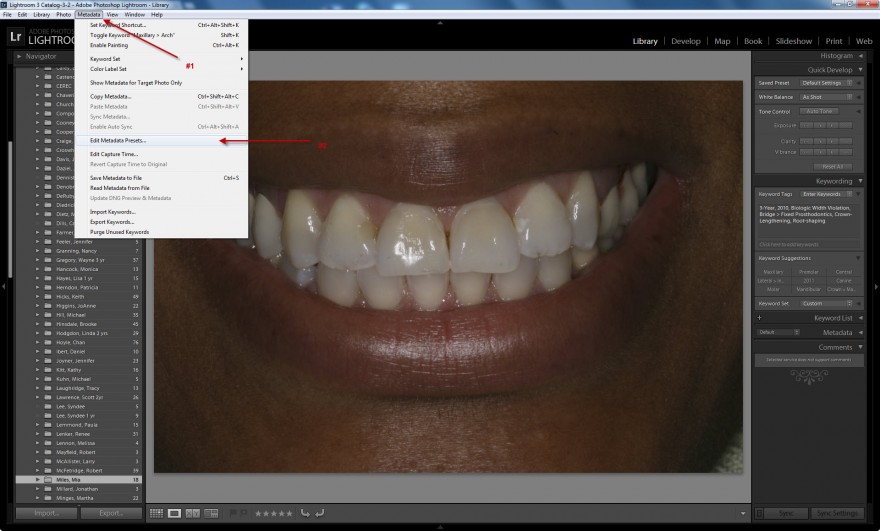
The first step is to create a Metadata Template that can be embedded into your photos.  Start at the Menu by choosing Metadata > Edit Metadata Presets, and you’ll see the following Dialog Box pop up (click for a larger view):


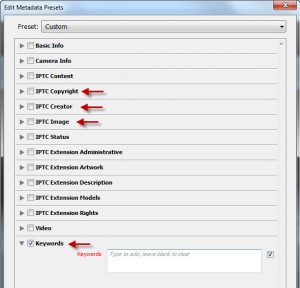
You don’t need to complete everything – total overkill.  The ones you do want to complete are the following sections, and at the end of this article you’ll see a set of screenshots of the information I include.
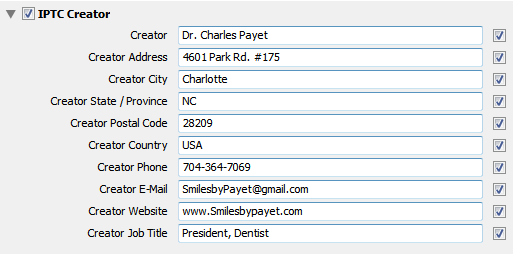
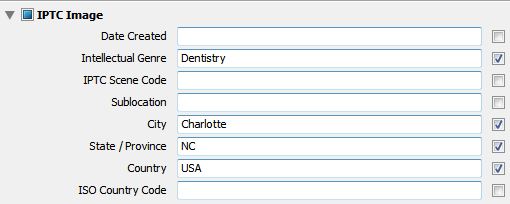
  • IPTC Copyright
  • IPTC Creator
  • IPTC Image (parts of it)
  • Keywords

Click the little arrow next to each section, and once you’ve filled in your information, you’ll save this as a new Preset; the easiest thing to do is call it, “Dr. So-and-So,” where you fill in your name.


Applying a Metadata Preset

Once you’ve created your Preset, you have 2 options, and I recommend you do both to be on the safe side:

  1. Apply that Preset to photos already in your Image Catalog, and
  2. Set this Preset to be automatically applied whenever photos are imported.

To apply the Preset to existing photos, it’s almost ridiculously easy.  Simply select all the photos to which you’ll apply the information, and go to the Right Sidebar of the Library Module > Metadata.  When it opens, click on the “Preset” location and choose the Preset you created.  You’ll be asked if you want to apply it to just the selected photos, all photos, or another combination.  Select “All Photos” And BAM!  You’re done with applying that information to photos you already have.  Easy, huh?

When you’re ready to import new photos, it’s about this easy, too.  Choose Import and select the source from which you’ll be importing the photos, most likely a memory card.  Again in the Right Side Toolbar of the Import Dialog, you’ll see a tab titled “Apply During Import.”  Directly under that, you’ll see an option to select a Metadata Preset.  Do that, and once you’ve chosen the folder to which you want to import, click Import.  And BAM!  Every photo imported from now on will have that information added to it, unless you change that import option.

Ensure the “Right” Metadata Stays During Export, But Don’t Violate HIPAA

There are a couple items to be sure of when exporting images for use on your website, on a social media platform such as Facebook, etc:

  1. Do NOT include your patient’s name in the file name or keywords (DUH!)
  2. When using a Publish Service or Export dialog, make sure to NOT strip out the metadata
Suggested Metadata to Include

The following are taken directly from the template I have created within Lightroom at my office; for my personal photography, I obviously use different information.

Because this post ended up longer than anticipated, look for an upcoming post on how to easily apply a Watermark with Lightroom.

If you’ve ever had someone steal your photos, I’d love to know how you found out and what you did about it in the Comments below!

Wacom Tablets Make Photo Editing Easy

January 9, 2011 by Charles Payet

Use a Wacom tablet to draw on photos for patient and lab communication.Have you ever tried hand-writing anything on a photo using a mouse?  Or using the mouse to make a selection in Photoshop/Photoshop Elements?  If so, you know just how frustrating and difficult it can be.  Your wrist probably also knows how strenuous it can be.  A few years ago, I was doing so much photo editing and typing, even with an ergonomic keyboard, that my wrists were starting to hurt, and at 2 points I had to wear a wrist-guard for support.  Needless to say, putting on latex gloves over one of those things didn’t work too well!

And that’s why I highly recommend you get a Wacom graphics tablet.  By using a natural hand-writing motion, you can paint, select, write, draw, etc. far more accurately and comfortably.


Wacom Intuos4 Graphics Tablets are Ideal for Dentists

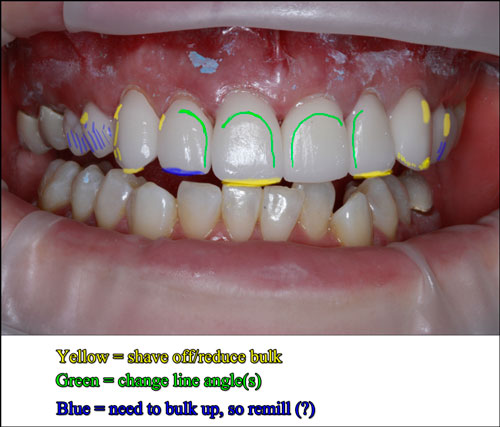
I love using my tablet particularly for cosmetic corrections on big cases, as demonstrated here.  This is a CEREC smile makeover case, 10 units of Empress MultiCAD shade BL3.  To be completely frank, this was my first 10-unit CEREC case, and while I felt pretty good about how it came out, it wasn’t quite good enough to bond in.

So I took some photos, put this one in Photoshop, and started drawing out the corrections I want to make.  I’ll send this to the patient to see if she agrees with me, then I’ll sit down in the lab to correct as needed (will have to redesign/remill a few of them) with this in front as a guide.


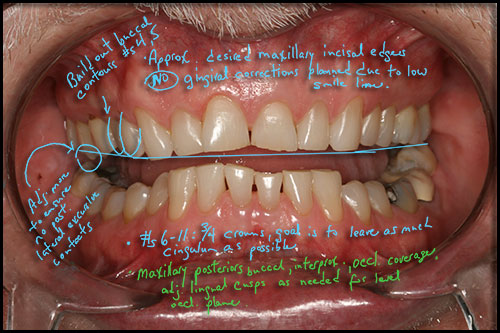
Here’s another case from a few years ago – using a Wacom pen/tablet, I can mark up photos as much as I want by using separate layers.  Send pictures like this to your lab in preparation for your diagnostic waxup, and it’s a lot easier for them to know what your thought process is and where you’re going with the case.  (Just so you know, this was one of about 4-5 pictures sent, not the only one, in case you were worried.)


After all……..how many have ever had a lab tell them they sent “too much” info for a big case?  😆

2011 and LOTS of New Info Coming!

January 3, 2011 by Charles Payet

Happy New Year!  😀

I just want to say that I am very excited about this coming year and what will be added here for your use.  Since I will be lecturing on an effective digital photography workflow for dentists, that will be the primary focus for the next 4 months.  As a person with ADD, blogging is a great way of helping me refine my thought processes and the workflow itself as I put them into a format that should be easily usable for you, my colleagues.

Here’s a little of what you can expect:

  1. Video tutorials
  2. Portrait photography tips and settings
  3. How to use your photos in Social Media
  4. Creating website galleries and building online photo galleries
  5. Creating MP4 videos for your office and websites

While there is such a huge wealth of information to present, my goal is to make this stuff EASY for you, so you don’t have to go through the same learning curve I did.  😉

  • Go to page 1
  • Go to page 2
  • Go to Next Page »

Copyright © 2025 · Atmosphere Pro on Genesis Framework · WordPress · Log in


Loading Comments...