• Skip to main content

Digital Dental Photography

Digital Photography and Workflow for Dentists

  • Home
  • Gear
    • Accessories
  • Clinical Dental Photography
    • Basic Settings
    • Patient and Camera Positions
    • Quadrants and Occlusals
    • Extraoral Photos
  • Software
    • Photo Organization
  • Portrait Photography Basics
  • Dental Websites
    • WordPress Websites
  • CE Reviews

Website Photos

Prepare Lightroom for 2013 Dental Photos

January 22, 2013 by Charles Payet

It’s the beginning of a new year, and if you haven’t already done so, it is time to create a new set of folders for 2013, and time to create a new Metadata Preset to be applied on import of all your photos.  Otherwise, you’ll be adding outdated metadata to your images and making your photo catalog less organized.  One side benefit of updating your Copyright Info in the Metadata Preset is this: if you upload any of those photos to your website, Google+ Local Page, Facebook Fan Page, etc., Google will recognize the year and know that it is new, fresh content.  And Google LOVES fresh content on websites!

Don’t forget to check out the short video tutorial at the bottom of the page, too!

Create A New Year Folder with Sub-headings

I’ve already discussed how I recommend organizing your Folder Hierarchy, and that hasn’t changed, although I changed a couple folder names this year, as you can see in this screenshot.  You can tell I did it before the end of 2012, as there wasn’t a single photo loaded into this year yet.
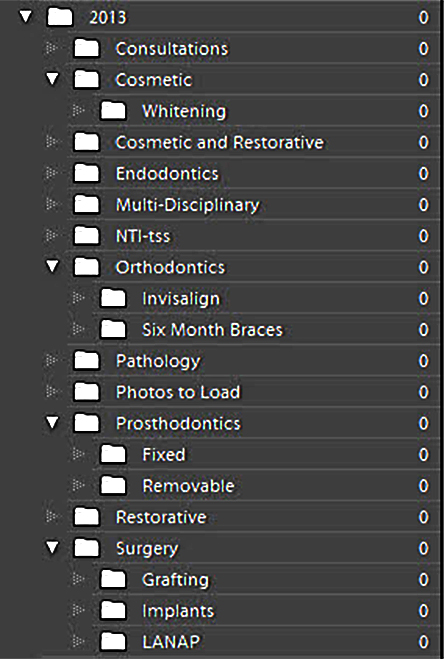
How to set up a folder hierarchy to organize dental photos in Lightroom

Of course, this is completely customizable depending on your procedure mix and desire to separate, or not separate them out as much as I do.

Create a New Copyright Metadata Preset for Import

To help protect your photos from online theft and misuse, make sure you read Image Copyright Protection; and now it’s time to create a NEW Metadata Preset.  Please DO NOT just “update” the one that you have; if you do so, every image to which you had applied the old one, i.e. for 2012, will now suddenly read as if it were taken in 2013 instead, which is wrong.  CREATE A NEW PRESET!

To do so, you must first be in the Library Module, then go to “Photos > Edit Metadata Preset” and you’ll come to this screen, and you can just enter the appropriate data for your practice.  As you can see at the bottom, in the box labeled “Keywords,” I’ve added just one keyword – 2013.  This is just to avoid having to add it to every photo.
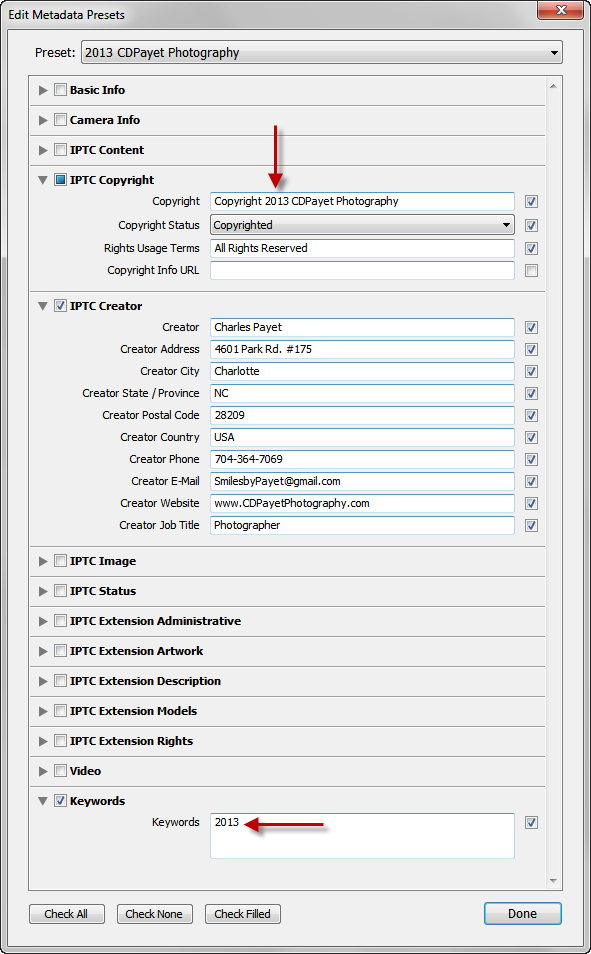
What copyright metadata information to add to a Lightroom preset.

And you’re set to go!

More Info on the Importance of Copyrighting Your Images

June 22, 2012 by Charles Payet

After my recent blog post on why embedding copyright information into your photos is so important, I was doing some additional reading on my Google+ Stream and came across this really useful and important video on why it’s so important to actually copyright your images, as well as how to do it.  I learned a lot and need to take some additional steps myself based on what I learned…..check it out!

I will find more resources on the actual process of submitting your images for copyright protection in the very near future, as I’m learning a lot of valuable information in the process of writing these articles.

Boosting Your Web Presence with Image SEO

April 2, 2011 by Charles Payet

Recently, in response to my post about improving patient communication by showing them their teeth, Sanjay Hirokedi asked if one can improve Google SERPs (Search Engine Results Pages/Positions) by optimizing images on Google Picasa, Flickr, Smugmug, and other online photo sharing sites, as well as your own dental website(s).  The answer is both simple and complex, but the basic answer is YES, you can improve your Google SERPs by optimizing pictures.  Here’s a little bit of how and why:

Content (including Pictures!) is King for Google, Bing, Yahoo

When it comes to the best way to improve your web presence in the search engines, always remember this motto: CONTENT IS KING. Search engines are all about relevent content, not just fluff, so besides linking strategies, proper use of headline tags (h1, h2, h3, etc), and other techniques, what you really want is information that your prospective patients are seeking. And yes….patients love to see pictures, because they’re easy to understand.  So if you know how to add the right information to your pictures in the code “behind” the pictures, you can tell the search engines that your pictures are relevant, and the pictures will be indexed and findable in searches.

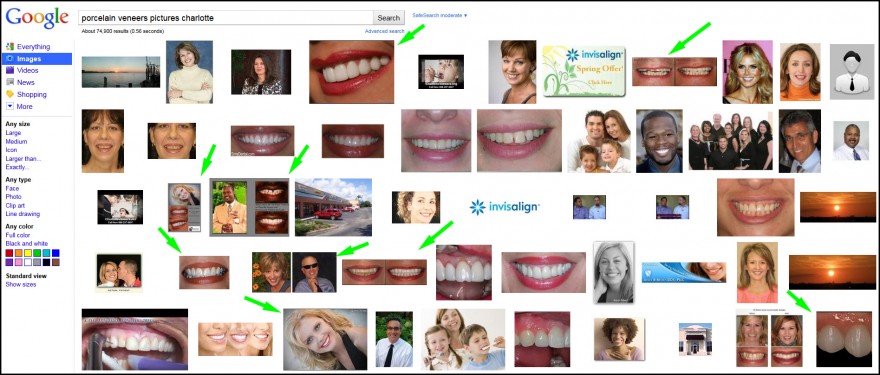
As an example, I did a Google Images search for “porcelain veneers pictures charlotte,” and this is what came up.  All of the pictures with a green arrow by them are from one or more of my websites, and if you were to do a similar search, then hover your mouse over each image, it would pop up for you to see from where Google found it.

(click for a larger version)


Keywords in the “Alt text” and File Names are SEO Tools

When looking at the code for a picture online, you would see something like this example:

<img src=”images/cindy-after-8-veneers.jpg” alt=”After picture of Smile with 8 Porcelain Veneers” height=”169″ width=”300″ />

The yellow highlighted text is the file name, and as you can see, in the file name itself, I have included some words people might use to search, “8 veneers,” and “after.” I didn’t put the word “picture” in, as Google already knows it’s a picture, so it’s a bit redundant.  DO NOT use file names like those that come from the camera, i.e. “_MG_9804.jpg,” as that has no meaning, and no one will ever search for a dentist with that, I promise!

The green highlighted text is what is called the “alternate text” of the picture, which is used by search engines for several purposes, but for our purposes, there is 1 very important one:

  1. Relevant content – again!  “After picture,” “smile,” and “8 porcelain veneers.”  Right back to the most important part of all SEO – RELEVANT CONTENT.  When you add the right alternate text, with appropriate keywords, you are telling the search engines what the picture is about.  Using a boring file name like _MG_9804 tells the googlebots absolutely nothing about the picture, so it’s irrelevant.  But keywords?  Bingo!

To be honest, these aren’t even the best file names and alt text that could be used; they’re from a website (TheCharlotteDentist) I haven’t updated in quite a while.  For a far more detailed explanation of how to properly use keywords in file names, alt text, etc., I highly recommend The Website Owner’s Manual for Dentists, by Dr. Mike Barr.  At only $347, it will be one of THE best purchases you will ever make for your dental practice if you have a website.

Important Note: everything you just read applies equally well to social media sites AND your own practice websites!

Social Media Sharing of Pictures: Which Work Best?

This topic is now moving into the realms of the more speculative, because while there may be books and/or research that has done real comparisons among the different social media photo sharing sites, I don’t know of it, and I don’t really have the time to look.  Just so you know.  😉  Therefore, what I am about to share with you is based exclusively on my own experience with the following 4:

  • Flickr (a bit more than beginning, but learning a lot these days)
  • Google PicasaWeb (beginnger/intermediate)
  • Facebook (intermediate level of experience)
  • SmugMug (reasonably advanced user)

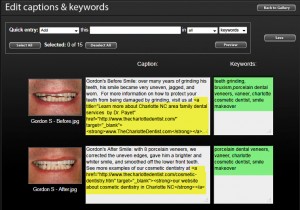
How the SmugMug photography sites make it easy to add keywords and descriptions for search engine optimization.As can be seen, I have the most experience with SmugMug, with which I built my photography website.  I do pay the $150/year fee for a PRO version because of some important features if you want to sell pictures, as I do, but most of you won’t need to do that.  However, if you do, email me for a Coupon Code that will save you some $$ on any level subscription.  😀

I really like the layout that SmugMug provides for editing the captions and keywords of large numbers of photos at once, as seen here for the following reasons:

  • Add keywords to a lot of pictures all at once or individually
  • Plenty of space in the keywords/phrases section to see ALL of the ones you’ve added at once
  • Ability to add hyperlinks (for example, to your website page on cosmetic dentistry, or CEREC, whatever) in the Caption/Description
  • Neat, organized layout onscreen

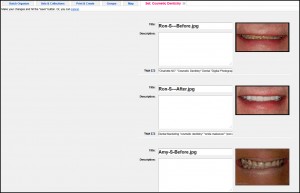
Screenshot demonstrating Flickr's layout for adding keywords and descriptions (alt text) to photos for SEOFlickr is reasonably close in ease of use, but the things I don’t like about their batch editing section are:

  • No way to add the same keyword to a lot of pictures at once
  • No ability to have hyperlinks in the description/caption
  • Not as neatly laid out onscreeen
  • The line to add keywords is just 1 line high, and you can’t see all the keywords/phrases at once.


Facebook has a pretty easy-to-use layout, too, but it has some VERY distinct disadvantages that bug the heck out of me:

  • It does not allow you to add distinct keywords, just a caption/description for each picture
  • No hyperlinks in the captions
  • You can only get to it when initially uploading pictures to an album!  YEESH!  And that’s why I don’t have a screenshot right now, ’cause I don’t need to add any pictures right now.  I’ll add it later.

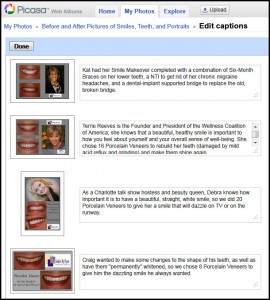
Lastly, Google PicasaWeb is about on the same level as Facebook, although it does allow you to add keywords distinct from the descriptions, but as with Flickr, not as easily, and not to more than 1 picture at a time.

Google does have 1 VERY distinct advantage, though: it’s part of Google!  Naturally, any photos added to Google’s PicasaWeb will be indexed rather quickly.  Whether or not this affects their findability?  I don’t know.


Add Keywords in Adobe Lightroom Before Uploading

While you can’t add a long caption within Lightroom, you CAN add all the keywords and phrases you like before you ever upload them, assuming you are using any of the Export or Publish features.  There are also Lightroom plugins that allow you to upload and keep track of the uploaded pictures right inside the program, as I described when talking about Jeffrey Friedl’s LR plugins for social media exports.

So when all is said and done, is it worth it to use photos to improve your website optimization?  ABSOLUTELY!  The pictures alone won’t do it, but they can, and should, be an important part of building your web presence, and online photo sharing sites can also help.

TheDentalWarrior.com & RevUpMyMarketing.com

February 25, 2011 by Charles Payet

[UPDATE] Since sometime in 2012, this manual is no longer in print.

I do not know if it will be available again.  Nor do I know of any impending updates.

I have known Dr. Mike Barr, of Boynton Beach, FL, for about the last 8 years through DentalTown.com, although we’ve only met once.  However, of all Townies, he has had one of the biggest impacts on me and my dental practice; in fact, he was also one of the guys I first remember reading on the subject of creative portrait photograghy.  In the last 2 years, though, his biggest influence has been through his The Complete Website Owner’s Manual for Dentists, of which I was just the 3rd person to buy one when it was released.

Dental Website Guru Extraordinaire

Mike relates that he started a dental website back in the late 1990’s, long before most people realized the power that the Internet would have in marketing our services.  Over the years, he continued learning and implementing, and for many years now, his website has been the dominant force for growth in his practice, even in an area that is heavily saturated with dentists.  As a FFS doc in a PPO/HMO-saturated area of Florida, his website has been the differentiating factor for him.  After years of dispensing valuable advice on website marketing on DentalTown, Mike finally decided to write a book, and what an amazing job he did.  So good, in fact, that Dr. Howard Farran called it one of the “Five Resources You Must Own”, and Howard does know a thing or 2 about what makes a practice successful!

My own personal experience with Mike’s manual goes something like this:

At the end of 2008, I’d had a website makeover for my Charlotte NC family dental practice, but I realized that – when I tried googling different search phrases – my website was still virtually invisible.  In the 5 years I’d had a website, I had probably generated less than $10,000 in total dentistry for all 5 years combined.

Then I got Mike’s manual in early 2009, and I set to work.  I fortunately did have the ability to edit the content of my website, and there were a lot of late nights spent writing and re-writing text, adding photos, links, everything.  Within a couple months, I decided to learn to write HTML and CSS and build my own websites with Adobe Dreamweaver, so by the fall of 2009, I had 5 total websites built and was optimizing them.

At the end of 2010, I checked my Referral Analysis reports, since we track incoming patients very carefully.  At that point, we were generating more than $20,000 per month in revenue from my websites!  Holy cow!

Now, there were other resources that I found, too, but Mike’s manual was THE foundation that got me going. I highly recommend you get it!

Dental Practice Rebel/Guru

Mike has always been a bit of a rebel when it comes to practice management.  He accepts assignment from no dental insurance, is not under contract for any PPO, has a practice full of 6MonthSmiles adult ortho patients, routinely does FMR and cosmetic dentistry cases, and all of this is in an area of Florida that is heavily saturated with dentists, most of whom DO take PPOs, assignment, and don’t do the kinds of procedures he does.  YET……Mike has made a great reputation for his dentistry in that environment, because he makes no bones about what he stands for.

Now Mike is starting a new website, in which he shares his passion for taking the “road less taken,” and making it work.  Given Mike’s passion and knowledge, you NEED to check it out and subscribe!

The Dental Warrior


Cosmetic Dentistry Portraits

February 23, 2011 by Charles Payet

Use Photo-Sharing Sites to Spread Your Pictures Around the Web

The portrait you see below (and you can click on it to see what happens) was posted directly from my photography website, which was actually the very first one I built, although not from scratch.  It is hosted with SmugMug as a Pro account for various reasons, one of which does happen to include ability to automatically watermark images in entire galleries quite easily.  There are certainly other options, such as Google’s Picasa Web Albums, Flickr, Zenfolio, etc..

This is just a short post to show an example of how you can spread pictures around the web easily, on your own, with no need for a web designer.  Simply create an account yourself (I do recommend setting up one specifically for the office, separate from any personal photo accounts you have), and upload pictures from your computer, then use the “Share” button to get your work out there for patients to see.  And really, the more places, the better!


Phaedra chose 6MonthSmiles to correct some mild crowding of her top front teeth, as she'd been self-conscious about them for years.  Now she loves her smile!Phaedra chose 6MonthSmiles to correct some mild crowding of her top front teeth, as she’d been self-conscious about them for years. Now she loves her smile!

2011 and LOTS of New Info Coming!

January 3, 2011 by Charles Payet

Happy New Year!  😀

I just want to say that I am very excited about this coming year and what will be added here for your use.  Since I will be lecturing on an effective digital photography workflow for dentists, that will be the primary focus for the next 4 months.  As a person with ADD, blogging is a great way of helping me refine my thought processes and the workflow itself as I put them into a format that should be easily usable for you, my colleagues.

Here’s a little of what you can expect:

  1. Video tutorials
  2. Portrait photography tips and settings
  3. How to use your photos in Social Media
  4. Creating website galleries and building online photo galleries
  5. Creating MP4 videos for your office and websites

While there is such a huge wealth of information to present, my goal is to make this stuff EASY for you, so you don’t have to go through the same learning curve I did.  😉

  • Go to page 1
  • Go to page 2
  • Go to Next Page »

Copyright © 2023 · Atmosphere Pro on Genesis Framework · WordPress · Log in


Loading Comments...