• Skip to main content

Digital Dental Photography

Digital Photography and Workflow for Dentists

  • Home
  • Gear
    • Accessories
  • Clinical Dental Photography
    • Basic Settings
    • Patient and Camera Positions
    • Quadrants and Occlusals
    • Extraoral Photos
  • Software
    • Photo Organization
  • Portrait Photography Basics
  • Dental Websites
    • WordPress Websites
  • CE Reviews

Digital Photography

Wacom Tablets Make Photo Editing Easy

January 9, 2011 by Charles Payet

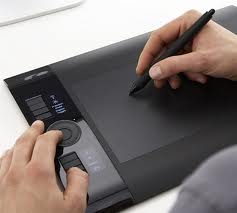
Use a Wacom tablet to draw on photos for patient and lab communication.Have you ever tried hand-writing anything on a photo using a mouse?  Or using the mouse to make a selection in Photoshop/Photoshop Elements?  If so, you know just how frustrating and difficult it can be.  Your wrist probably also knows how strenuous it can be.  A few years ago, I was doing so much photo editing and typing, even with an ergonomic keyboard, that my wrists were starting to hurt, and at 2 points I had to wear a wrist-guard for support.  Needless to say, putting on latex gloves over one of those things didn’t work too well!

And that’s why I highly recommend you get a Wacom graphics tablet.  By using a natural hand-writing motion, you can paint, select, write, draw, etc. far more accurately and comfortably.


Wacom Intuos4 Graphics Tablets are Ideal for Dentists
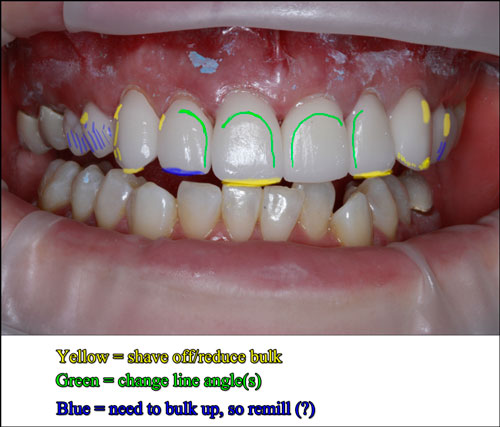
I love using my tablet particularly for cosmetic corrections on big cases, as demonstrated here.  This is a CEREC smile makeover case, 10 units of Empress MultiCAD shade BL3.  To be completely frank, this was my first 10-unit CEREC case, and while I felt pretty good about how it came out, it wasn’t quite good enough to bond in.

So I took some photos, put this one in Photoshop, and started drawing out the corrections I want to make.  I’ll send this to the patient to see if she agrees with me, then I’ll sit down in the lab to correct as needed (will have to redesign/remill a few of them) with this in front as a guide.
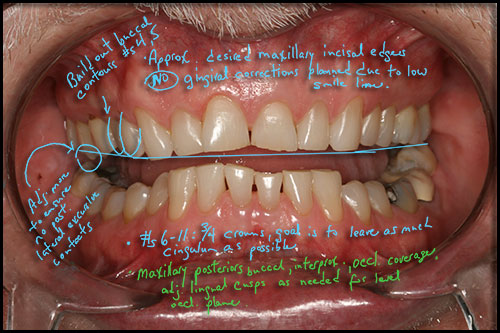

Here’s another case from a few years ago – using a Wacom pen/tablet, I can mark up photos as much as I want by using separate layers.  Send pictures like this to your lab in preparation for your diagnostic waxup, and it’s a lot easier for them to know what your thought process is and where you’re going with the case.  (Just so you know, this was one of about 4-5 pictures sent, not the only one, in case you were worried.)


After all……..how many have ever had a lab tell them they sent “too much” info for a big case?  😆
2011 and LOTS of New Info Coming!

January 3, 2011 by Charles Payet

Happy New Year!  😀

I just want to say that I am very excited about this coming year and what will be added here for your use.  Since I will be lecturing on an effective digital photography workflow for dentists, that will be the primary focus for the next 4 months.  As a person with ADD, blogging is a great way of helping me refine my thought processes and the workflow itself as I put them into a format that should be easily usable for you, my colleagues.

Here’s a little of what you can expect:

  1. Video tutorials
  2. Portrait photography tips and settings
  3. How to use your photos in Social Media
  4. Creating website galleries and building online photo galleries
  5. Creating MP4 videos for your office and websites

While there is such a huge wealth of information to present, my goal is to make this stuff EASY for you, so you don’t have to go through the same learning curve I did.  😉

Saving Your Patient Photos

January 2, 2011 by Charles Payet

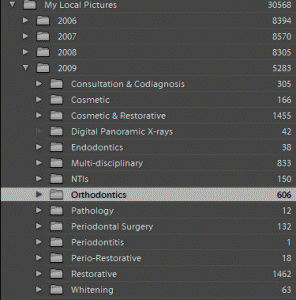
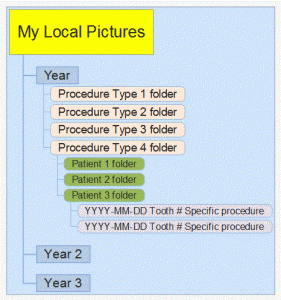
When it comes to saving all your patient photos, if you are not doing it through your Practice Management Software (PMS), you need a structured format to make it easy to save future photos and to be able to find past ones.  The folder format that I use within Lightroom is one I learned from my Dad, who is a highly organized businessman, with just a few tweaks.

Within the “My Pictures” folder, here is the folder structure I’ve been using for the last 4+ years:

Looking at my folders then, this is how the “big picture” is structured:

An illustration of the folder structure for dental patient pictures

Going deeper within a patient’s folder, it will look something like this:

In an upcoming post, I’ll discuss the importance of keyword tagging your photos, and how to create a keyword heirarchy within Lightroom for easy searchability.

8 Uses for Dental Photography

December 29, 2010 by Charles Payet

Patients often ask why we take photos, and especially why we take so many.  So for a quick summary of why you, as a dentist, should use digital photography in your practice, here you go:

1. Dental Insurance – it’s hard for an insurance adjuster to deny a claim of a tooth with a big hole in it from doing the endo, or showing the huge cavity, etc.

2. Case Presentation – whether using the iPad, PowerPoint, or whatever, you want an easy way to show patients what is going on in their mouths, whether it’s a single cracked tooth, periodontitis, bruxism, etc.

3. Diagnosis – it is IMO impossible to properly diagnose and treatment plan complex cases without good photography.

4. CYA – it’s unfortunate that I had to do so, but I have avoided several problems with the NC Board regarding patient complaints because I had a case thoroughly documented start-to-finish, thereby eliminating the patient’s ability to say I did poor dentistry.

5. Tracking Your Work Over Time – with keyword tagging, you can label your pictures and later do searches based on them to follow the success (hopefully!) of your treatment over years and decades.

6. Self-Improvement – it’s kind of tough to hide from yourself when the pictures are on a 24″ HD monitor or bigger.  Pictures don’t lie, and I know that I am motivated to do better when I take a picture and find some fault (however nitpicky) that I didn’t see before dismissing the patient.

7. Lab Communication – it’s a LOT easier to communicate with a lab about shade, contour, etc. using high-quality photographs than trying to draw it out on paper.

8. Showcase Your Work to Patients – it’s far more effective to show patients considering some treatment photos of YOUR work than of someone else’s, especially on the Web.

Hooray! Lightroom 3 is finally released!

June 8, 2010 by Charles Payet

Oh, I am so excited, and all you dental photographers should be, too!  Adobe has finally released Photoshop Lightroom v.3, and I’m downloading it right now.  I can’t wait to show you how wonderful this program is for us as dentists/photographers, because there are so many features here that you are going to LOVE, even if you’re a real newbie to this game.  Now that we’ve successfully moved to our new Charlotte dental office, and we’re getting things settled down a bit more, I finally have a little more time to do all the work for this site that I’ve been wanting to do. Since I’m adding a new orthodontic assistant full-time in July, it’s time to develop some new and improved training materials so I can get my whole staff up-to-speed…..it’s nice to have guinea pigs for something like this, you know?  LOL

Stay tuned!

Look for an upcoming interview!

March 4, 2010 by Charles Payet

Well, this was kind of fun!  Thanks to my friend, Dr. Lorne Lavine, and his blog The Digital Dentist, I was recently contacted by Kathy Kincade, the Editor-in-Chief of an online dental trade magazine, DrBicuspid.com, about doing an interview on why the Canon T2i DSLR will be such a great dental camera.  Not exactly sure when the article will be published, but I’ll provide a link to it once it comes out.

Also, we just finished a full-mouth reconstruction case a couple weeks ago and saw the patient for a 2-week post-op checkup, and I’ll show some different ways to showcase pictures like this for print and the web.  I’ll use that to lead into my overdue post on how to manage/understand patient expectations in aesthetic cases by using digital photography, because how you showcase your other work can be both a powerful marketing tool and communications tool to understand just what it is your next patient wants.

  • « Go to Previous Page
  • Go to page 1
  • Go to page 2
  • Go to page 3
  • Go to Next Page »

Copyright © 2025 · Atmosphere Pro on Genesis Framework · WordPress · Log in


Loading Comments...