• Skip to main content

Digital Dental Photography

Digital Photography and Workflow for Dentists

  • Home
  • Gear
    • Accessories
  • Clinical Dental Photography
    • Basic Settings
    • Patient and Camera Positions
    • Quadrants and Occlusals
    • Extraoral Photos
  • Software
    • Photo Organization
  • Portrait Photography Basics
  • Dental Websites
    • WordPress Websites
  • CE Reviews

Dental Photography

A Ring Flash Technique for Tooth Shade Matching

January 10, 2011 by Charles Payet

In response to a question on DentalTown regarding how to get rid of the excessive flash on the central incisors when taking a shade for lab restorations, my colleague Dr. David Cook responded with this trick to solve the problem.  The description and photos are both courtesy of him.

One solution when you get too much perpendicular flash returning directly towards your lens is to alter the angle of your lens to the flat facial surfaces as others have advised.

Another solution is to still shoot perpendicular to the flat facial surfaces, but remove the ring flash from the front of your lens, hold it on top of your lens and angle it down 30-45 degrees. The flash is the same distance from the teeth, but the light angling down will not give you as much reflective washed out areas.

This image, the lens is perpendicular to the flat facial surface and the attached flash is perpendicular. Note the large reflected washed out facial areas on the centrals.
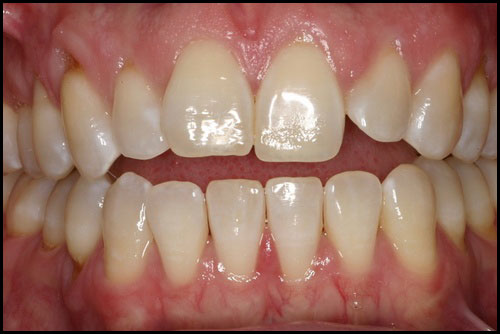

This image, the lens is still perpendicular, but I removed the ring flash, held it above the lens and angled it down 30-45 degrees. There are still highlights, but not the large washed out areas. You can also see the incisal translucency better and characterizations when the flash is taken off and angled down.
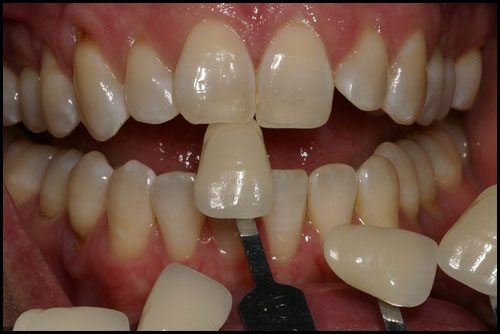
As others pointed out, another option is to use a twin-lite flash, such as the Canon MT-24EX TTL Macro Twin Lite or the Nikon R1C1 Wireless Closeup Speedlight system.  These are generally more difficult to use for anything except the anterior teeth unless you are very experienced.
2011 and LOTS of New Info Coming!

January 3, 2011 by Charles Payet

Happy New Year!  😀

I just want to say that I am very excited about this coming year and what will be added here for your use.  Since I will be lecturing on an effective digital photography workflow for dentists, that will be the primary focus for the next 4 months.  As a person with ADD, blogging is a great way of helping me refine my thought processes and the workflow itself as I put them into a format that should be easily usable for you, my colleagues.

Here’s a little of what you can expect:

  1. Video tutorials
  2. Portrait photography tips and settings
  3. How to use your photos in Social Media
  4. Creating website galleries and building online photo galleries
  5. Creating MP4 videos for your office and websites

While there is such a huge wealth of information to present, my goal is to make this stuff EASY for you, so you don’t have to go through the same learning curve I did.  😉

Saving Your Patient Photos

January 2, 2011 by Charles Payet

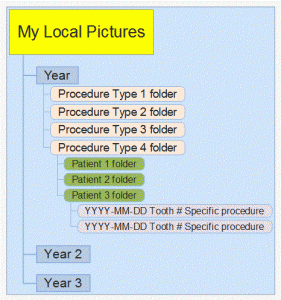
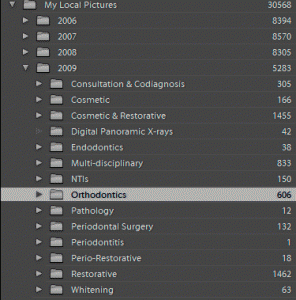
When it comes to saving all your patient photos, if you are not doing it through your Practice Management Software (PMS), you need a structured format to make it easy to save future photos and to be able to find past ones.  The folder format that I use within Lightroom is one I learned from my Dad, who is a highly organized businessman, with just a few tweaks.

Within the “My Pictures” folder, here is the folder structure I’ve been using for the last 4+ years:

Looking at my folders then, this is how the “big picture” is structured:

An illustration of the folder structure for dental patient pictures

Going deeper within a patient’s folder, it will look something like this:

In an upcoming post, I’ll discuss the importance of keyword tagging your photos, and how to create a keyword heirarchy within Lightroom for easy searchability.

Where Do You Get Dental Website Photos?

December 30, 2010 by Charles Payet

A Townie friend of mine, Lisa Weber of ProductionFinder.com, recently related this story that emphasizes 3 extremely important points:

  1. Be sure that your website photos are legitimate,
  2. Why you should use your OWN photos on your website, and
  3. Take the appropriate steps to protect your photos.

I’ll be posting more on how to get your own photos onto your website in an attractive format, as well as on how to protect your photos (within limits) in upcoming blog posts.

And now, in Lisa’s own words:

I thought I’d post a recent situation because my guess is it’s more common than you might think. This will be long so bear with me.  This is what happened recently:

Client emailed me to inquire about my services and we agreed to talk by phone the following day.  I checked out the name online to see where the practice was and take a tour of the website.  A website can tell me quite a bit about a practice, so I usually pop into all of the pages.  I looked at the Smile Gallery and saw some very familiar smiles.

The images (all of them) were images I’d actually participated in taking in a practice I used to work in, and now work for on a consulting basis.  I knew the names associated with those smiles.  What are the chances of my stumbling on those images?  Pretty darn close to nil.  Before assigning blame to the dentist, I decided to check out the web designer.  I found 5 websites for dentists in that same area of Arizona using the exact same images.  There were a few additional images on several of them but the galleries were virtually identical.  That’s when I assumed the dentists were under the impression they were stock images and the web designer had been the one who had likely just copied and pasted them.  They were all small images, saved as jpegs with the different practices names,  numbered sequentially.

I saved an archived version of all the sites in question prior to doing anything and then called the web designer.  I was unable to get a person, so left a message and also sent an email.  I then began to contact their clients and tell them what the situation was, explaining that our assumption was that they had no idea those images weren’t available for use.  Each of the offices were able to get the images removed from their sites.  I searched again and found yet another dental website using them and contacted that practice last night.  Speaking with an incredible OM, I explained the history and that my only purpose is to get the images removed and we do not hold the dentist responsible at this time.  I explained that the web designer had placed her doctor in a very precarious position because ultimately it was his liability.  I recommended they pull out the original contract to see if the web designer represented that he had all rights to the images he was going to use.

After receiving my message that if I didn’t receive a call by close of business, I would rely on our attorney to make any future communications, I received a call from the sales person from the Web designer.  He stated that although he believed he got all the images from a Lumineer site, he would go ahead and remove them.  He said his business was no longer in operation, regardless.  I asked him if his clients knew this and he assured me that they did.  I mentioned that I had spoken with several dentists in the past week who would be very surprised that they were no longer in business.  I also mentioned that not only were the images not from a Lumineer site, but none of them displayed a Lumineer, since that is a product that neither doctor has ever used.  He seemed to feel it might be possible they were not the images I felt they were until I indicated that by “participating” in the photography, I meant I was actually in the room when those images were taken, cropped them and have them saved on flash drives along with a few thousand other images that I have been recently viewing for inclusion in the new website once it goes live.   Those Before and After images being shown in Arizona were born and raised in Middleburg Virginia.

Not only did this web designer copy and paste the images (from an outdated website) but they used the identical images in a competitive market for offices that were geographically close to each other!  One image in particular really ticked me off because it was probably the most beautiful after pic I have ever seen of an implant crown on a central after months of tissue development and a dead-on perfect shade and characterization match by the ceramist.  Those aren’t easy to do and was a testament to that particular dentist’s skill.   That after pic should have been earned, not copied and pasted.

So…..very long story….but…..I would strongly recommend that you verify that images used in your website (all of them) have clear records of having been obtained for your use, either by you or by your webdesigner.  This is likely going to be a bigger problem very quickly, and it’s only a matter of time till people run into a dentist who isn’t as reasonable as the one I worked for.  I feel like a detective this week, but I’m glad I stumbled on those pics, that’s for certain. I think the doctor that first contacted me is glad I did as well.

I, for one, am grateful that there are people like Lisa out there, who will do the right thing by both the dentists who were ripped off by their web designer, as well as by the dentist to whom the patients and photos belong.  Who knows how far those photos might have spread, were it not for Lisa’s vigilance.

8 Uses for Dental Photography

December 29, 2010 by Charles Payet

Patients often ask why we take photos, and especially why we take so many.  So for a quick summary of why you, as a dentist, should use digital photography in your practice, here you go:

1. Dental Insurance – it’s hard for an insurance adjuster to deny a claim of a tooth with a big hole in it from doing the endo, or showing the huge cavity, etc.

2. Case Presentation – whether using the iPad, PowerPoint, or whatever, you want an easy way to show patients what is going on in their mouths, whether it’s a single cracked tooth, periodontitis, bruxism, etc.

3. Diagnosis – it is IMO impossible to properly diagnose and treatment plan complex cases without good photography.

4. CYA – it’s unfortunate that I had to do so, but I have avoided several problems with the NC Board regarding patient complaints because I had a case thoroughly documented start-to-finish, thereby eliminating the patient’s ability to say I did poor dentistry.

5. Tracking Your Work Over Time – with keyword tagging, you can label your pictures and later do searches based on them to follow the success (hopefully!) of your treatment over years and decades.

6. Self-Improvement – it’s kind of tough to hide from yourself when the pictures are on a 24″ HD monitor or bigger.  Pictures don’t lie, and I know that I am motivated to do better when I take a picture and find some fault (however nitpicky) that I didn’t see before dismissing the patient.

7. Lab Communication – it’s a LOT easier to communicate with a lab about shade, contour, etc. using high-quality photographs than trying to draw it out on paper.

8. Showcase Your Work to Patients – it’s far more effective to show patients considering some treatment photos of YOUR work than of someone else’s, especially on the Web.

Important adapter for new Canon 100mm Macro

December 27, 2010 by Charles Payet

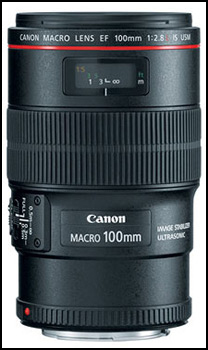
I confess, I did not bother learning much about the new Canon 100mm f/2.8L IS macro lens that was introduced early in 2010 due to the significantly greater cost and the minimal increase in usefulness for dental macro photography.

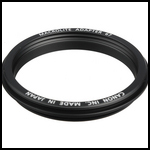
Recently, however, I learned from Mike McKenna at Photomed.net, that the new 100mm macro does NOT have the little “lip” at the end to allow the Canon MR14-EX ring flash or the Canon MT-24EX Twin Lite flash to be added.  Why?  I have no idea, as such flashes are an integral part of many macro photographer’s gear.  In fact, I think it’s pretty stupid, but hey, I guess it’s just another way for Canon to squeeze a few more dollars out of you, because now you have to buy the Macrolite 67 adapter (see below) for another $32 or so if you do choose to buy the new version of the 100mm macro.

  • « Go to Previous Page
  • Go to page 1
  • Go to page 2
  • Go to page 3
  • Go to page 4
  • Go to page 5
  • Go to page 6
  • Go to Next Page »

Copyright © 2025 · Atmosphere Pro on Genesis Framework · WordPress · Log in


Loading Comments...