• Skip to main content

Digital Dental Photography

Digital Photography and Workflow for Dentists

  • Home
  • Gear
    • Accessories
  • Clinical Dental Photography
    • Basic Settings
    • Patient and Camera Positions
    • Quadrants and Occlusals
    • Extraoral Photos
  • Software
    • Photo Organization
  • Portrait Photography Basics
  • Dental Websites
    • WordPress Websites
  • CE Reviews

Dental Photography

Image Copyright Protection

June 13, 2012 by Charles Payet

Ever worry that an unscrupulous web designer, colleague, or ad company might steal your images from your Facebook page, website, or other online source?  If so, read on to learn some easy ways to help protect your work, provide legal coverage if necessary for action, and how to find out if your photos have been stolen.

Has Your Photography Been Stolen Online?
To my knowledge at this time, I’ve never had any of my online photos “stolen,” by which I mean no one has downloaded or “hot-linked” them for use on their on website or in other marketing media.  That’s not to say it hasn’t happened, it just means I’ve never found any examples, because I don’t spend the time searching to find out.

Online Image Protection Has Limits

First off – if someone is REALLY determined to steal your photos, it is virtually impossible to stop it.  Sure, there are ways to add “right-click” protection to stop the easy “save as” copying, and there are ways to hide the image file location to prevent someone using an HTML embed, but in the end, there are far more ways being created on a daily basis to get around them than there are ways to stop them.  If hackers can break into major corporations and government agencies…….well, you get the idea, right?  But since it’s unlikely you’re up against that kind of firepower, mostly you’re looking to keep unethical web designers and colleauges from using your work to advertise themselves.  Fortunately, there are some easy and fast steps to do this with Photoshop Lightroom, and the best part is that, while the initial set-up takes a little time, after that it is virtually automatic and needs no more than a couple mouse-clicks…..seriously!

Creating Copyright Metadata Templates

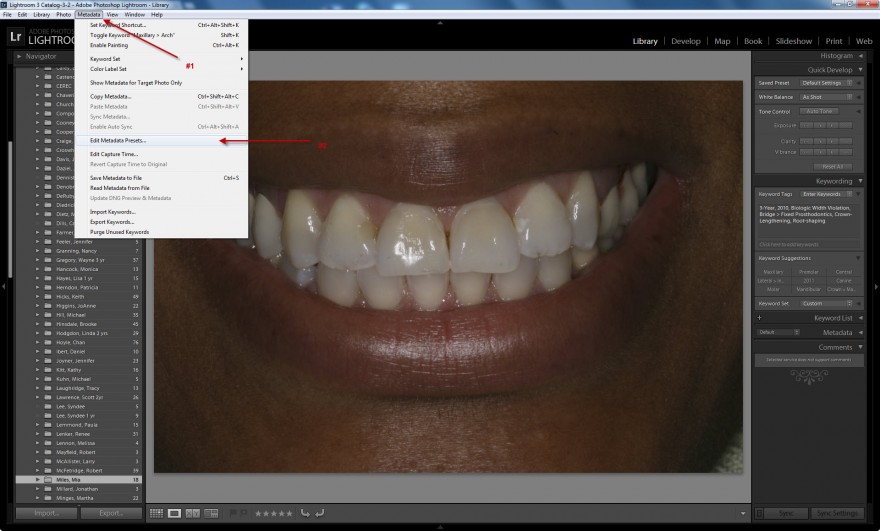
The first step is to create a Metadata Template that can be embedded into your photos.  Start at the Menu by choosing Metadata > Edit Metadata Presets, and you’ll see the following Dialog Box pop up (click for a larger view):
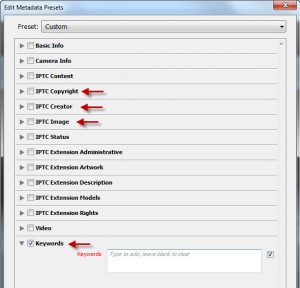
 

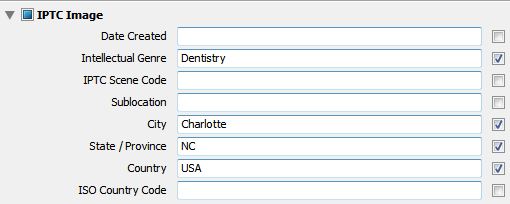
You don’t need to complete everything – total overkill.  The ones you do want to complete are the following sections, and at the end of this article you’ll see a set of screenshots of the information I include.

  • IPTC Copyright
  • IPTC Creator
  • IPTC Image (parts of it)
  • Keywords

Click the little arrow next to each section, and once you’ve filled in your information, you’ll save this as a new Preset; the easiest thing to do is call it, “Dr. So-and-So,” where you fill in your name.


Applying a Metadata Preset

Once you’ve created your Preset, you have 2 options, and I recommend you do both to be on the safe side:

  1. Apply that Preset to photos already in your Image Catalog, and
  2. Set this Preset to be automatically applied whenever photos are imported.

To apply the Preset to existing photos, it’s almost ridiculously easy.  Simply select all the photos to which you’ll apply the information, and go to the Right Sidebar of the Library Module > Metadata.  When it opens, click on the “Preset” location and choose the Preset you created.  You’ll be asked if you want to apply it to just the selected photos, all photos, or another combination.  Select “All Photos” And BAM!  You’re done with applying that information to photos you already have.  Easy, huh?

When you’re ready to import new photos, it’s about this easy, too.  Choose Import and select the source from which you’ll be importing the photos, most likely a memory card.  Again in the Right Side Toolbar of the Import Dialog, you’ll see a tab titled “Apply During Import.”  Directly under that, you’ll see an option to select a Metadata Preset.  Do that, and once you’ve chosen the folder to which you want to import, click Import.  And BAM!  Every photo imported from now on will have that information added to it, unless you change that import option.

Ensure the “Right” Metadata Stays During Export, But Don’t Violate HIPAA

There are a couple items to be sure of when exporting images for use on your website, on a social media platform such as Facebook, etc:

  1. Do NOT include your patient’s name in the file name or keywords (DUH!)
  2. When using a Publish Service or Export dialog, make sure to NOT strip out the metadata
Suggested Metadata to Include

The following are taken directly from the template I have created within Lightroom at my office; for my personal photography, I obviously use different information.

Because this post ended up longer than anticipated, look for an upcoming post on how to easily apply a Watermark with Lightroom.

If you’ve ever had someone steal your photos, I’d love to know how you found out and what you did about it in the Comments below!
Boosting Your Web Presence with Image SEO

April 2, 2011 by Charles Payet

Recently, in response to my post about improving patient communication by showing them their teeth, Sanjay Hirokedi asked if one can improve Google SERPs (Search Engine Results Pages/Positions) by optimizing images on Google Picasa, Flickr, Smugmug, and other online photo sharing sites, as well as your own dental website(s).  The answer is both simple and complex, but the basic answer is YES, you can improve your Google SERPs by optimizing pictures.  Here’s a little bit of how and why:

Content (including Pictures!) is King for Google, Bing, Yahoo

When it comes to the best way to improve your web presence in the search engines, always remember this motto: CONTENT IS KING. Search engines are all about relevent content, not just fluff, so besides linking strategies, proper use of headline tags (h1, h2, h3, etc), and other techniques, what you really want is information that your prospective patients are seeking. And yes….patients love to see pictures, because they’re easy to understand.  So if you know how to add the right information to your pictures in the code “behind” the pictures, you can tell the search engines that your pictures are relevant, and the pictures will be indexed and findable in searches.

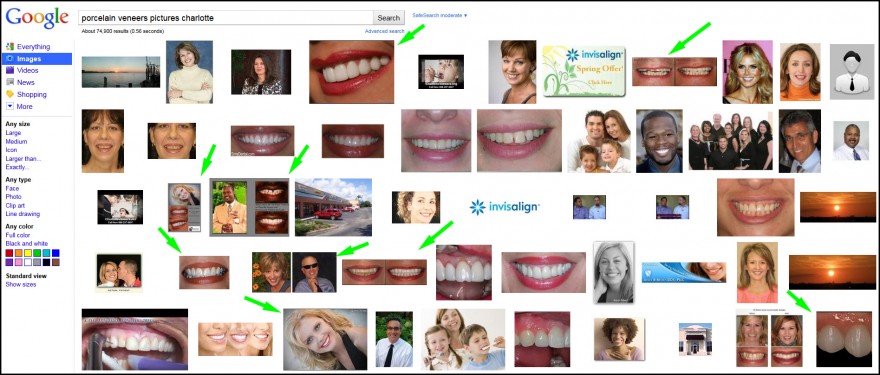
As an example, I did a Google Images search for “porcelain veneers pictures charlotte,” and this is what came up.  All of the pictures with a green arrow by them are from one or more of my websites, and if you were to do a similar search, then hover your mouse over each image, it would pop up for you to see from where Google found it.

(click for a larger version)


Keywords in the “Alt text” and File Names are SEO Tools

When looking at the code for a picture online, you would see something like this example:

<img src=”images/cindy-after-8-veneers.jpg” alt=”After picture of Smile with 8 Porcelain Veneers” height=”169″ width=”300″ />

The yellow highlighted text is the file name, and as you can see, in the file name itself, I have included some words people might use to search, “8 veneers,” and “after.” I didn’t put the word “picture” in, as Google already knows it’s a picture, so it’s a bit redundant.  DO NOT use file names like those that come from the camera, i.e. “_MG_9804.jpg,” as that has no meaning, and no one will ever search for a dentist with that, I promise!

The green highlighted text is what is called the “alternate text” of the picture, which is used by search engines for several purposes, but for our purposes, there is 1 very important one:

  1. Relevant content – again!  “After picture,” “smile,” and “8 porcelain veneers.”  Right back to the most important part of all SEO – RELEVANT CONTENT.  When you add the right alternate text, with appropriate keywords, you are telling the search engines what the picture is about.  Using a boring file name like _MG_9804 tells the googlebots absolutely nothing about the picture, so it’s irrelevant.  But keywords?  Bingo!

To be honest, these aren’t even the best file names and alt text that could be used; they’re from a website (TheCharlotteDentist) I haven’t updated in quite a while.  For a far more detailed explanation of how to properly use keywords in file names, alt text, etc., I highly recommend The Website Owner’s Manual for Dentists, by Dr. Mike Barr.  At only $347, it will be one of THE best purchases you will ever make for your dental practice if you have a website.

Important Note: everything you just read applies equally well to social media sites AND your own practice websites!

Social Media Sharing of Pictures: Which Work Best?

This topic is now moving into the realms of the more speculative, because while there may be books and/or research that has done real comparisons among the different social media photo sharing sites, I don’t know of it, and I don’t really have the time to look.  Just so you know.  😉  Therefore, what I am about to share with you is based exclusively on my own experience with the following 4:

  • Flickr (a bit more than beginning, but learning a lot these days)
  • Google PicasaWeb (beginnger/intermediate)
  • Facebook (intermediate level of experience)
  • SmugMug (reasonably advanced user)

How the SmugMug photography sites make it easy to add keywords and descriptions for search engine optimization.As can be seen, I have the most experience with SmugMug, with which I built my photography website.  I do pay the $150/year fee for a PRO version because of some important features if you want to sell pictures, as I do, but most of you won’t need to do that.  However, if you do, email me for a Coupon Code that will save you some $$ on any level subscription.  😀

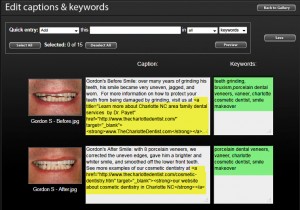
I really like the layout that SmugMug provides for editing the captions and keywords of large numbers of photos at once, as seen here for the following reasons:

  • Add keywords to a lot of pictures all at once or individually
  • Plenty of space in the keywords/phrases section to see ALL of the ones you’ve added at once
  • Ability to add hyperlinks (for example, to your website page on cosmetic dentistry, or CEREC, whatever) in the Caption/Description
  • Neat, organized layout onscreen

Screenshot demonstrating Flickr's layout for adding keywords and descriptions (alt text) to photos for SEOFlickr is reasonably close in ease of use, but the things I don’t like about their batch editing section are:

  • No way to add the same keyword to a lot of pictures at once
  • No ability to have hyperlinks in the description/caption
  • Not as neatly laid out onscreeen
  • The line to add keywords is just 1 line high, and you can’t see all the keywords/phrases at once.


Facebook has a pretty easy-to-use layout, too, but it has some VERY distinct disadvantages that bug the heck out of me:

  • It does not allow you to add distinct keywords, just a caption/description for each picture
  • No hyperlinks in the captions
  • You can only get to it when initially uploading pictures to an album!  YEESH!  And that’s why I don’t have a screenshot right now, ’cause I don’t need to add any pictures right now.  I’ll add it later.

Lastly, Google PicasaWeb is about on the same level as Facebook, although it does allow you to add keywords distinct from the descriptions, but as with Flickr, not as easily, and not to more than 1 picture at a time.

Google does have 1 VERY distinct advantage, though: it’s part of Google!  Naturally, any photos added to Google’s PicasaWeb will be indexed rather quickly.  Whether or not this affects their findability?  I don’t know.


Add Keywords in Adobe Lightroom Before Uploading

While you can’t add a long caption within Lightroom, you CAN add all the keywords and phrases you like before you ever upload them, assuming you are using any of the Export or Publish features.  There are also Lightroom plugins that allow you to upload and keep track of the uploaded pictures right inside the program, as I described when talking about Jeffrey Friedl’s LR plugins for social media exports.

So when all is said and done, is it worth it to use photos to improve your website optimization?  ABSOLUTELY!  The pictures alone won’t do it, but they can, and should, be an important part of building your web presence, and online photo sharing sites can also help.

Adobe Lightroom Export Plugin to Facebook Fan Pages

March 19, 2011 by Charles Payet

For a long time, one small barrier has kept me from uploading a lot more photos to my office Facebook Fan Page: Facebook.com/TheCharlotteDentist, and that is the simple fact that Lightroom did not have the ability to upload directly (no Publish Service) to Fan Pages — only to Personal Pages.  I had to export the pictures from Lightroom to another folder, THEN go to Facebook and upload them from there.  Not that it is a lot of work, but it required more steps than how easily I can Publish photos to my SmugMug photography site, CDPayetPhotography.com, where I have photo galleries of 6MonthSmiles Invisible Adult Braces patients, porcelain veneer before/after pictures, and more.

Jeffrey Friedl’s Lightroom Plugin Exports Directly to Fan Page Albums

Well, tonight (March 20th, 2011) I was researching some material to put in my upcoming Townie Meeting 2011 lecture on dental digital photography workflow, and through various roundabout ways, I ended up back on the blog of Jeffrey Friedl, who has been creating and updating highly functional Adobe Lightroom plugins for as long as Lightroom has been around.  And I happened to read this very exciting statement:

Note: as of version 20110116.147, the plugin can upload to albums on fan/group pages.

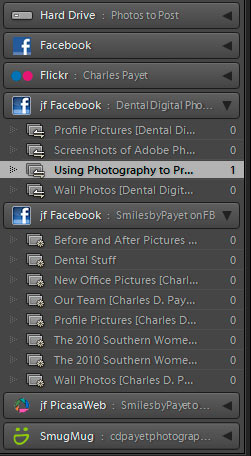
Dentists can easily export pictures to the office Fan Page with this Adobe Lightroom plugin.Needless to say, I immediately downloaded the new plugin and registered it (it’s Donationware, which means it is “almost” free, which means all you have to do is pay the minimum 1 US penny via PayPal for unlimited registration/use of the plugin) with a $20 donation.  With just a minute needed to authenticate to Facebook, suddenly I had the easiest way possible to send all the pictures I could want directly to Facebook and even keep track of them within Lightroom.  You can even set it up for multiple Fan Pages, as I’ve shown here.

I highly recommend Adobe Photoshop Lightroom for dentists, and with this Facebook plugin, it became an even better option, given how important Social Media is becoming in promoting our dental practices.

Show Your Patient the Problem with Pictures

February 15, 2011 by Charles Payet

If you already use digital photography, you probably know how much easier it is to communicate with patients using pictures of their own teeth.  Today was a perfect example of why you should be doing this, and then how you can turn that into communication with your entire patient base!

A Cracked Tooth but No Pain & the Patient Doesn’t Believe You

Ever had this happen before?  You start prepping a simple DO composite on a molar or premolar due to some interproximal decay you saw on a bitewing, and maybe you’re replacing an existing amalgam or composite, and suddenly you’re staring at a crack that runs the entire mesio-distal width of the tooth, and you have to tell the patient s/he needs a crown.

Even better, the patient has had absolutely no symptoms, and maybe is a new patient whom you know to have had a bad experience with their last dentist and who didn’t want to fix something that wasn’t causing any symptoms.

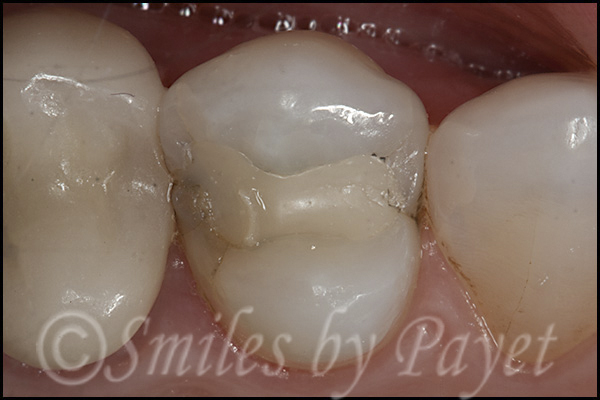
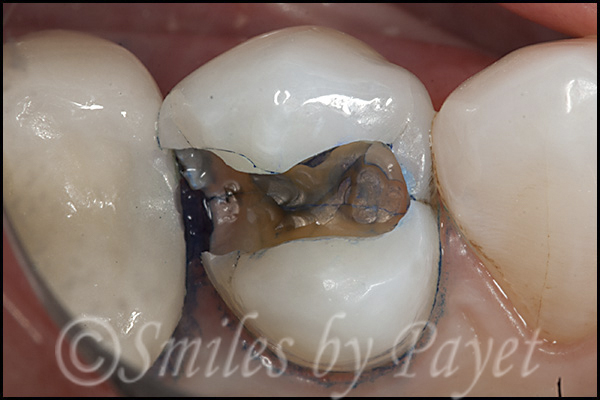
I was fortunate that this (kinda) scenario happened with a long-time patient today, and so I didn’t have to deal with any of the issues in the second paragraph, but just take a look at the photos:

Preop, I knew there were at least some craze lines both mesially and distally, but would you have thought these were really that bad?  Even with my Zeiss PICO microscope at 8.8x magnification, I was anticipating a simple DO, maybe MOD composite.

OOPS!  This was NOT what I expected, although we’ve all seen it plenty of times.

So I questioned her again, and she repeated that she had had NO symptoms, which is really a good thing, of course, but a bit surprising.

Without a Picture, How Do You Communicate with Patients?

At work, I still use a Canon Digital Rebel XTi, which is probably 2.5 years old, and the screen isn’t very big.  Nevertheless, I just zoomed in and showed the patient this picture, explaining that the blue dye was highlighting the crack so she could see it well.  Do you think she had any hesitation in accepting the need for a crown instead of a filling?  Nope!

Blogging, Email Blasts, & the iPad for Patient Education

OK, so this patient quickly understood (literally about 10 seconds) why she needed a crown (nearly $1200 in my practice) instead of a 3-surface composite (about $295-ish).  But what if you’d like to show a lot of patients this?

  • I’ve already written a blog post about this topic: Why Does a Tooth with a Small Filling Need a Crown?
  • Tomorrow I will send out an email blast through Constant Contact or Mail Chimp (I’m still experimenting with which one I like) to my entire patient base, alerting them to this important information.
  • The blog post will automatically feed into my Facebook Fan Page for The Charlotte Dentist
  • I will also load these photos into the “Cracked Tooth” demonstration for the DDS GP YES! app for my iPad so my staff can show patients with similar situations these photos; do you think they’ll have any more difficulty understanding than my patient today did?
  • Next I can upload these photos to my Flickr account, Picasa Web Albums, or more — with the right alt text tags and links back to my Charlotte dental practice website, I can build my web presence and SERPs.  Heck — did you notice that, in this one blog post, I just created 3 links back to my website?  Over time, these links add authority and “link juice” to boost my rankings!


Canon Announces 2 New DSLR Cameras

February 11, 2011 by Charles Payet

While there are numerous digital SLR manufacturers, in dentistry (as in the rest of the digital camera market) there are really only 2 players: Canon & Nikon.  The simple reason?  There are more dentists shooting with these 2 brands than any other, because they have a long history of excellent products, from camera bodies to lenses and flashes.  Each has been working to one-up the other steadily over the last few years, with the result being ever-more-affordable pro-sumer DSLR cameras, with greater ease-of-use, and far more features than we really could have imagined only a few years ago.  And now Canon has announced the next in its series of EOS DSLR cameras, both of which would be excellent for dentists.

I had been planning on purchasing a Canon T2i in a month or so, but I’ve decided to hold off on replacing my Canon XTi’s at the office for just a little bit longer.  😀 This way, I’ll get to have one just in time for the Townie Meeting.  Anyone interested in buying a couple Canon XTi cameras for an extremely reasonable price around early March — contact me then.

DDS GP: The iPad “Killer App” for Dentists

January 11, 2011 by Charles Payet

Do you have an iPad?  If not, WHY NOT!?!?!?  😀

We got our iPad right after it came out in 2010, and I must say, it has essentially replaced my laptop for any time I need a computer but am not sitting at my desk.  There’s a darn good reason Oprah named it one of her Ultimate Favorite Things.

But for dentists, IMO, there is now a completely different reason for the iPad to become one of YOUR ultimate favorite things, and that is one particular app:  DDS GP.

Use Your Own Photos to Educate Your Dental Patients

One of the best features of this app, is the ability to add your own patient photos to individual presentations.  All you have to do is create a folder of pictures to sync to the iPad, and from within the app, select the photos to add to each presentation, with no limit.  So add Before/After Portraits — composites, amalgams, CERECs, and more!  Then put the iPad in your patients’ hands and simply WOW them!

%CODE1%

Customizable, Portable, & Easy-to-Learn for Dentists and Dental Teams

The DDS GP app currently has more than 200 different presentations, and more are being added regularly.  They include such procedures and diagnoses as:

  • Bleaching: In Office
  • Bone Graft with Extraction
  • Bridge: Porcelain, Anterior
  • Crown-Lengthening
  • Brushing: Bass Technique
  • Cracked Tooth, Cusp
  • Crown: CEREC
  • Invisalign
  • Nightguard: NTI
  • Veneer, Single: Porcelain, Lab

Affordable Dental Case Presentation Software vs. CASEY or GURU

Unlike Patterson Dental’s CASEY (which can run up to $8000) or Henry-Schein’s GURU (not sure, but I have heard about $2000?), DDS GP is truly affordable — only $399! No, I am not kidding, AND that includes free lifetime updates! No, I am not kidding about that, either.

Email Treatment Plans, Add Fees, Include the Presentations, & More

From directly within the app, you can create treatment plans and add presentations from the app, then send it right to your patient via email, or if you have a compatible printer, print it directly from your iPad.  This makes it easy for husbands or wives to show their spouses the same, easy-to-understand presentations that helped them make the decision to move forward on treatment.

  • « Go to Previous Page
  • Go to page 1
  • Go to page 2
  • Go to page 3
  • Go to page 4
  • Interim pages omitted …
  • Go to page 6
  • Go to Next Page »

Copyright © 2025 · Atmosphere Pro on Genesis Framework · WordPress · Log in


Loading Comments...