• Skip to main content

Digital Dental Photography

Digital Photography and Workflow for Dentists

  • Home
  • Gear
    • Accessories
  • Clinical Dental Photography
    • Basic Settings
    • Patient and Camera Positions
    • Quadrants and Occlusals
    • Extraoral Photos
  • Software
    • Photo Organization
  • Portrait Photography Basics
  • Dental Websites
    • WordPress Websites
  • CE Reviews

Charles Payet

TheDentalWarrior.com & RevUpMyMarketing.com

February 25, 2011 by Charles Payet

[UPDATE] Since sometime in 2012, this manual is no longer in print.

I do not know if it will be available again.  Nor do I know of any impending updates.

I have known Dr. Mike Barr, of Boynton Beach, FL, for about the last 8 years through DentalTown.com, although we’ve only met once.  However, of all Townies, he has had one of the biggest impacts on me and my dental practice; in fact, he was also one of the guys I first remember reading on the subject of creative portrait photograghy.  In the last 2 years, though, his biggest influence has been through his The Complete Website Owner’s Manual for Dentists, of which I was just the 3rd person to buy one when it was released.

Dental Website Guru Extraordinaire
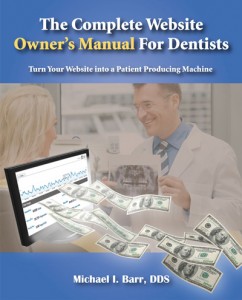
Mike relates that he started a dental website back in the late 1990’s, long before most people realized the power that the Internet would have in marketing our services.  Over the years, he continued learning and implementing, and for many years now, his website has been the dominant force for growth in his practice, even in an area that is heavily saturated with dentists.  As a FFS doc in a PPO/HMO-saturated area of Florida, his website has been the differentiating factor for him.  After years of dispensing valuable advice on website marketing on DentalTown, Mike finally decided to write a book, and what an amazing job he did.  So good, in fact, that Dr. Howard Farran called it one of the “Five Resources You Must Own”, and Howard does know a thing or 2 about what makes a practice successful!

My own personal experience with Mike’s manual goes something like this:

At the end of 2008, I’d had a website makeover for my Charlotte NC family dental practice, but I realized that – when I tried googling different search phrases – my website was still virtually invisible.  In the 5 years I’d had a website, I had probably generated less than $10,000 in total dentistry for all 5 years combined.

Then I got Mike’s manual in early 2009, and I set to work.  I fortunately did have the ability to edit the content of my website, and there were a lot of late nights spent writing and re-writing text, adding photos, links, everything.  Within a couple months, I decided to learn to write HTML and CSS and build my own websites with Adobe Dreamweaver, so by the fall of 2009, I had 5 total websites built and was optimizing them.

At the end of 2010, I checked my Referral Analysis reports, since we track incoming patients very carefully.  At that point, we were generating more than $20,000 per month in revenue from my websites!  Holy cow!

Now, there were other resources that I found, too, but Mike’s manual was THE foundation that got me going. I highly recommend you get it!

Dental Practice Rebel/Guru

Mike has always been a bit of a rebel when it comes to practice management.  He accepts assignment from no dental insurance, is not under contract for any PPO, has a practice full of 6MonthSmiles adult ortho patients, routinely does FMR and cosmetic dentistry cases, and all of this is in an area of Florida that is heavily saturated with dentists, most of whom DO take PPOs, assignment, and don’t do the kinds of procedures he does.  YET……Mike has made a great reputation for his dentistry in that environment, because he makes no bones about what he stands for.

Now Mike is starting a new website, in which he shares his passion for taking the “road less taken,” and making it work.  Given Mike’s passion and knowledge, you NEED to check it out and subscribe!

The Dental Warrior


Cosmetic Dentistry Portraits

February 23, 2011 by Charles Payet

Use Photo-Sharing Sites to Spread Your Pictures Around the Web

The portrait you see below (and you can click on it to see what happens) was posted directly from my photography website, which was actually the very first one I built, although not from scratch.  It is hosted with SmugMug as a Pro account for various reasons, one of which does happen to include ability to automatically watermark images in entire galleries quite easily.  There are certainly other options, such as Google’s Picasa Web Albums, Flickr, Zenfolio, etc..

This is just a short post to show an example of how you can spread pictures around the web easily, on your own, with no need for a web designer.  Simply create an account yourself (I do recommend setting up one specifically for the office, separate from any personal photo accounts you have), and upload pictures from your computer, then use the “Share” button to get your work out there for patients to see.  And really, the more places, the better!


Phaedra chose 6MonthSmiles to correct some mild crowding of her top front teeth, as she'd been self-conscious about them for years.  Now she loves her smile!Phaedra chose 6MonthSmiles to correct some mild crowding of her top front teeth, as she’d been self-conscious about them for years. Now she loves her smile!

Show Your Patient the Problem with Pictures

February 15, 2011 by Charles Payet

If you already use digital photography, you probably know how much easier it is to communicate with patients using pictures of their own teeth.  Today was a perfect example of why you should be doing this, and then how you can turn that into communication with your entire patient base!

A Cracked Tooth but No Pain & the Patient Doesn’t Believe You

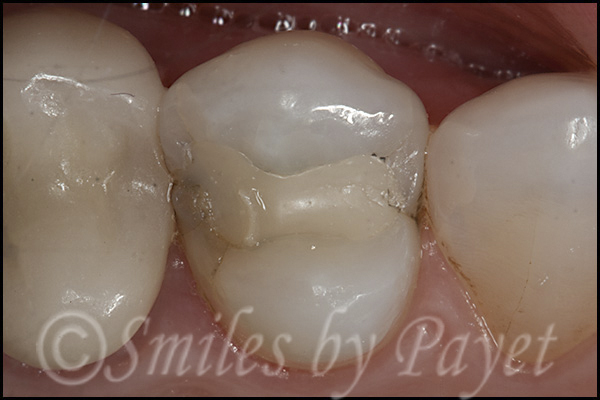
Ever had this happen before?  You start prepping a simple DO composite on a molar or premolar due to some interproximal decay you saw on a bitewing, and maybe you’re replacing an existing amalgam or composite, and suddenly you’re staring at a crack that runs the entire mesio-distal width of the tooth, and you have to tell the patient s/he needs a crown.

Even better, the patient has had absolutely no symptoms, and maybe is a new patient whom you know to have had a bad experience with their last dentist and who didn’t want to fix something that wasn’t causing any symptoms.

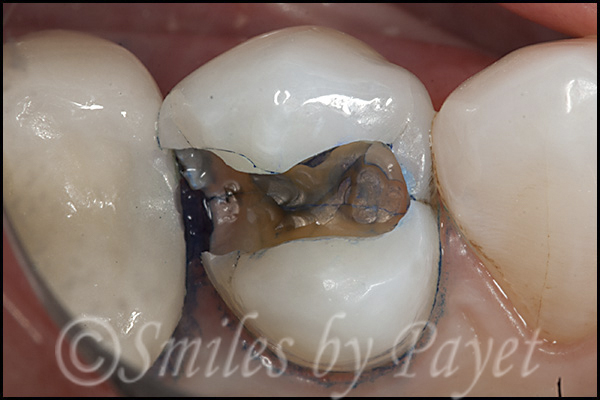
I was fortunate that this (kinda) scenario happened with a long-time patient today, and so I didn’t have to deal with any of the issues in the second paragraph, but just take a look at the photos:

Preop, I knew there were at least some craze lines both mesially and distally, but would you have thought these were really that bad?  Even with my Zeiss PICO microscope at 8.8x magnification, I was anticipating a simple DO, maybe MOD composite.

OOPS!  This was NOT what I expected, although we’ve all seen it plenty of times.

So I questioned her again, and she repeated that she had had NO symptoms, which is really a good thing, of course, but a bit surprising.

Without a Picture, How Do You Communicate with Patients?

At work, I still use a Canon Digital Rebel XTi, which is probably 2.5 years old, and the screen isn’t very big.  Nevertheless, I just zoomed in and showed the patient this picture, explaining that the blue dye was highlighting the crack so she could see it well.  Do you think she had any hesitation in accepting the need for a crown instead of a filling?  Nope!

Blogging, Email Blasts, & the iPad for Patient Education

OK, so this patient quickly understood (literally about 10 seconds) why she needed a crown (nearly $1200 in my practice) instead of a 3-surface composite (about $295-ish).  But what if you’d like to show a lot of patients this?

  • I’ve already written a blog post about this topic: Why Does a Tooth with a Small Filling Need a Crown?
  • Tomorrow I will send out an email blast through Constant Contact or Mail Chimp (I’m still experimenting with which one I like) to my entire patient base, alerting them to this important information.
  • The blog post will automatically feed into my Facebook Fan Page for The Charlotte Dentist
  • I will also load these photos into the “Cracked Tooth” demonstration for the DDS GP YES! app for my iPad so my staff can show patients with similar situations these photos; do you think they’ll have any more difficulty understanding than my patient today did?
  • Next I can upload these photos to my Flickr account, Picasa Web Albums, or more — with the right alt text tags and links back to my Charlotte dental practice website, I can build my web presence and SERPs.  Heck — did you notice that, in this one blog post, I just created 3 links back to my website?  Over time, these links add authority and “link juice” to boost my rankings!


How Many Ways Does Lightroom Let You Use Your Pictures?

February 12, 2011 by Charles Payet

As I’ve discussed, if you can’t actually DO something with your pictures, then they become nothing more than nice documentation for yourself, possibly insurance, or possibly to defend yourself against lawsuits or Board complaints.  The real power of pictures, though, is in their ability to educate and motivate patients, whether in your office or out.  And this is where I find Adobe Photoshop Lightroom so helpful.  Just check out the list of ways you can output images from Lightroom (using my own example websites, social media, etc.):

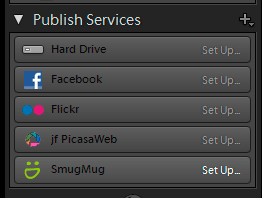
social media photo publishing and sharing options within Adobe LightroomSocial Media Photo Sharing Options

While there is unfortunately no way to upload photos from Lightroom to Facebook Fan Pages (serious bummer, but you can work around it), you can set up Publishing Services for other social media sites, such as

  • Flickr
  • Smugmug (where I host my professional photography site)
  • Google Picasa albums (which you can link to your Google Places page)

This allows you to select a group of pictures and batch upload them with a single click.

Create Patient Slideshows, Custom Print Layouts, & Web Galleries

There is one feature that Lightroom currently lacks, and that is the ability to design photobooks directly within the software, and this is certainly something that would be terrific for dentists.  Aperture 3 and iPhoto, both by Apple, do have this capability built in; something we’ll hope for in future versions of Lightroom.  If you are an Adobe user, Photoshop Elements 9 has this capability.

However, in most popular programs now, you can select a group of photos and have them merged into a MPEG4 video, including music and captions, even a voice over explanation if you want to take the time.  You can create custom layouts for ortho, for lab communication, and printed pages to put in a 3-ring binder as an alternative to a printed photobook, and more.  And you can

Canon Announces 2 New DSLR Cameras

February 11, 2011 by Charles Payet

While there are numerous digital SLR manufacturers, in dentistry (as in the rest of the digital camera market) there are really only 2 players: Canon & Nikon.  The simple reason?  There are more dentists shooting with these 2 brands than any other, because they have a long history of excellent products, from camera bodies to lenses and flashes.  Each has been working to one-up the other steadily over the last few years, with the result being ever-more-affordable pro-sumer DSLR cameras, with greater ease-of-use, and far more features than we really could have imagined only a few years ago.  And now Canon has announced the next in its series of EOS DSLR cameras, both of which would be excellent for dentists.

I had been planning on purchasing a Canon T2i in a month or so, but I’ve decided to hold off on replacing my Canon XTi’s at the office for just a little bit longer.  😀 This way, I’ll get to have one just in time for the Townie Meeting.  Anyone interested in buying a couple Canon XTi cameras for an extremely reasonable price around early March — contact me then.

To Take Better Dental Pictures: Take Your Camera Home

February 11, 2011 by Charles Payet

Yes, you read that right!  Take your camera home and experiment with it.  Especially if you are a newbie to digital photography beyond the P&S cameras for family.

Understand the Fundamentals of Photography

for Ideal Dental Photos by Having FUN


While you don’t HAVE to understand how DSLR cameras work in order to get the best results (visit our page on basic settings for dental intraoral and extraoral photography for my recommendations), it is a lot easier to do so, and a lot more fun, if you do learn.  And the easiest and most enjoyable way to learn, is simply to take your camera home and shoot as many pictures as you can.  One warning however……it can get addictive! My personal home photo catalog is nearly 27,000 images, and my work catalog is now over 45,000.  😀 Some examples (click on the image for larger versions):


Every one of these images required understanding different combinations of ISO, aperture, shutter speed, etc.  As I said, you don’t NEED to learn this, but if you do, you will then really KNOW how to take the pictures you want, especially when you want to start taking fun portraits.  And you’ll end up with more exciting and dramatic pictures of your family and vacations.


OK, so I was having a bit of fun just “showing off” a few of my favorite photos 😀 , but I think you get the point, right?  Realistically, shooting your family and pets around the house and neighborhood will give you the closest comparison to what you will shoot for patients, as you can see the effect of different combinations of aperture and shutter speed.

Use Extremes in Aperture and Shutter Speed to Experiment– on MANUAL MODE

If you always have the camera on full Automatic, you don’t have to think, right?  So to really see what happens, make sure the camera is on (M)anual on your top dial; do leave the lens on (A)utofocus to minimize the aggravation of having out-of-focus pictures of your kids, especially if they’re like mine and move fast.

Experiment #1:

  • ISO 100
  • WB: Cloudy
  • Shutter speed: 1/200
  • Aperture: f/3.5

Experiment #1a: Keep everything the same except change Aperture to f/15

Experiment #1b: Keep everything the same except change Shutter speed to 1/80

Experiment #1c: Keep everything the same except change WB to Tungsten

Use a Notebook to keep track

If you’re not familiar with using the Metadata that is automatically captured with very image, then consider keeping a notebok and writing down each combination per picture.  Yes, I know this can be a bit time-consuming, but it is a time-honored tradition that works very well.  Of course, if you take a minute and learn where to see the Metadata within your photo software, then you can look at each image and compare on screen, best using a side-by-side view as below.

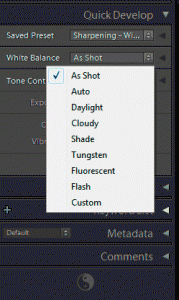
Shoot RAW and you can change the WB within your software

Obviously, once you’ve taken the picture, you can’t change most of the settings.  There is ONE setting, however, that you can change in your software if you have been shooting RAW images, and that is the White Balance (WB).  This allows you to experiment a bit more easily, as you can leave the WB setting the same for every picture, then just switch the setting on the computer and immediately see how it changes.  At left is what the drop-down menu looks like in Lightroom.

Recommended Reading:

Understanding Exposure by Bryan Peterson is one of the best books for getting a good grasp of these concepts.  And once you have become more comfortable with the fundamentals, then read any of his next books to keep going.

For taking routine intraoral and extraoral dental pictures, the main benefit to learning these concepts will be to help you troubleshoot your pictures.   The fun part, though, will come when you start taking more patient portraits (as shown on my dental website).

  • « Go to Previous Page
  • Go to page 1
  • Interim pages omitted …
  • Go to page 3
  • Go to page 4
  • Go to page 5
  • Go to page 6
  • Go to page 7
  • Interim pages omitted …
  • Go to page 10
  • Go to Next Page »

Copyright © 2025 · Atmosphere Pro on Genesis Framework · WordPress · Log in


Loading Comments...