• Skip to main content

Digital Dental Photography

Digital Photography and Workflow for Dentists

  • Home
  • Gear
    • Accessories
  • Clinical Dental Photography
    • Basic Settings
    • Patient and Camera Positions
    • Quadrants and Occlusals
    • Extraoral Photos
  • Software
    • Photo Organization
  • Portrait Photography Basics
  • Dental Websites
    • WordPress Websites
  • CE Reviews

Charles Payet

Shade Matching Made Easy

October 29, 2012 by Charles Payet

Do you struggle with taking accurate shades for challenging anterior cosmetic dentistry cases, such as large composite resins or porcelain crowns? Like most of you, I’ve always considered this one of the hardest aspects of dentistry, even with the power of digital photography.  Now, however, a new tool has arrived that promises to revolutionize and simplify this challenge.  It’s easy to use, affordable, and the most powerful tool for analyzing and communicating hue, value, and chroma in our dental restorations that I have ever used.

The polar_eyes Cross-Polarizing Filter

Shade matching in cosmetic dentistry is easy with the polar_eyes filter I first learned about this revolutionary new filter design on Facebook from Dr. Jason Smithson, whose composite resin artistry easily rivals that of the best lab technicians. Designed by Dr. Panaghiotis Bazos, a Greek dentist trained at the University of Southern California (Class of 2000), this filter is easily attached to Canon, Nikon, Sigma, and Metz ring flashes.

Color is Complicated

Just recently,  Dr. Lane Ochi posted an Online CE Course on DentalTown.com that uses Color Theory to teach how we perceive color, and while I had learned some of this earlier, he gives the most thorough description I’ve seen – highly recommended.  Fair warning – you’ll probably want to review it several times to really absorb the material, because he packs a LOT into that 1-hour course.

In simple terms, however, one of the biggest challenges we face when taking shades for cosmetic dentistry, whether porcelain or composite, is the reflection of light from the teeth, whether that reflection comes from overhead lights, ceiling lights, or the camera flash.  The human eye has difficulty dealing with how that reflection can hide details of color.  And given that most of us aren’t trained in truly understanding color, even if we can see it, how do we communicate it to the lab?   For years, dentists have used different kinds of shade-matching devices, but based on many reviews, none of them have been particularly easy to use, and most of them are expensive.

Eliminate the Glare, and What’s Left is Color and Brightness
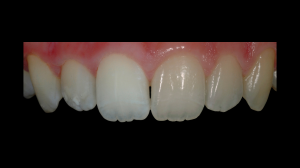
Removing light reflection from teeth with the polar_eyes filter lets color come throughTake a look at this example photo (courtesy of Dr. Bazos), and what do you see?  On the right side of the photo is what we typically see in DSLR photos taken with a ring flash, and on the left side is how teeth look  when photographed using the same exact settings and the polar_eyes cross-polarizing filter.  The difference is striking and easy to understand.

Since this blog is dedicated to making dental photography easy-to-understand, at this time, I am not going to discuss what exactly cross-polarization is, because it’s not really necessary to understand it to use this cool little device.  Perhaps at a later date.

The polar_eyes is incredibly easy to install, but it’s a little tricky to keep in place for Canon flashes due to the flash design (not the filter design).  Attached by a set of stick-on magnets, it is easily set up on your flash in about 2 minutes (if you’re really slow at reading the directions).  Press the sticky side of the magnets to a clean flash surface, and you’re good to go!  The filter is removed by gently sliding the filter up for down – you don’t want to pull it off, as the magnets can pull off, too.  Don’t ask me how I know, ok?  😉

Where to Buy the polar_eyes?

Dr. Bazos has made the polar_eyes exclusively available through www.Photomed.net in the USA.  Outside the USA, you will need to contact Dr. Bazos directly.

Cost: This is the absolute best part – it’s only $499!  Extra sets of magnets (highly recommended by me to be on the safe side) will be a bit more, but as of the time I purchased mine, the price for them had not yet been determined.  But compared to almost any other system currently available, this is super-affordable and amazingly easy to use.  Literally, the first time you take a photo with it and look, you will love it.

More details and tutorials will be upcoming, so be on the lookout.

Photography Should be Fun Part 2

August 10, 2012 by Charles Payet

Building again on the theme that the best way to learn photography, is to take photos of things besides teeth, here’s an adventure for which I’ve signed up, and to which you are certainly invited, too!

The NY Photowalk with Joel Tjintjelaar & Co.

As I mentioned in my previous post about the Google+ One-Year Anniversary Photowalk, Google+ has become a worldwide forum for photographers of all levels, and many of the world’s best photographers do post and interact there.  Pretty darn cool, if you ask me.  🙂  Many of those amazing photographers offer hands-on learning seminars in the field, just as with hands-on dental CE, and those seminars are a great way to expand your knowledge of photography.

One such event is the NY Photowalk, which will be held this coming November 10-14, 2012, with some international award-winning photographers:

  • Joel Tjintjelaar
  • Sharon Tenenbaum
  • Armand Dijcks
Here’s the details if you’re interested.

NY Photo Walk originally shared:
4th and Formal Announcement: New York City
 Architectural Photography Walk / Course – Nov. 10 – 13, 2012 – Detailed Route Information and a few surprises

BEGINNER OR ADVANCED,
come join us to take your photography to the next level!
Registration space is limited so hurry to sign up now as the clock is ticking and we’re getting closer to the start date!

DETAILED ROUTES (NEW!)
The 4 day detailed walk routes are now available for online viewing on Google Maps https://maps.google.com/maps/ms?msid=201545091262127996664.0004c5be4758671b5e402&msa=0
and as downloadable JPG files on our +NY Photo Walk page https://plus.google.com/b/102406418598992189071/photos/102406418598992189071/albums/5769968179604251985

SPECIAL GUEST SPEAKER MARC KOEGEL (NEW!)
We are excited to announce that Marc will be honoring us with a guest lecture. Marc Koegel is professional commercial and award winning fine art photographer, educator, writer and director of the Vancouver Photo Workshops Studio.
His black and white landscapes, nudes and architectural photographs have been widely exhibited in Canada, US and Europe.

FREE PHOTO GIVE-AWAY PRIZES (NEW!)
Joel and Sharon will be giving out free hand signed Fine Art prints as draw prizes!

HOTEL RECOMMENDATIONS, DETAILED DAILY SCHEDULES, INFORMATION ON LOCATIONS/BUILDINGS
Hotel recommendations, detailed daily schedules and information about each location/buildings will follow in the next announcements – Keep Posted.

FOR MORE INFO ON THE INSTRUCTIONAL SESSIONS CHECK OUR PREVIOUS ANNOUNCEMENTS OR SEE BELOW FOR A SUMMARY

ADVANCED B&W POST PROCESSING TECHNIQUES AND 3 WEEKS OF ONLINE PORTFOLIO REVIEWS POST-COURSE WITH JOEL TJINTJELAAR’S B&W MASTERCLASS
Joel will reveal in detail and step by step how he creates award winning B&W photographs using software like Photoshop and Silver Efex Pro2. An important part of Joel’s instructional B&W post processing sessions will be on the processing of architectural photographs. A part that doesn’t end with the NYC workshop on November 13 but will be extended online for 3 weeks post-workshop with reviewing and online support on image post-processing.

TRANSFORMING PHOTOGRAPHY INTO ART BY DEVELOPING VISION
Learn to cultivate ‘The Eye’ of a Fine Art Photographer by developing a deeper understanding of Architectural Photography with +Sharon Tenenbaum and +Joel Tjintjelaar Learn to see the geometric relationships of structures and their surroundings.

*LONG EXPOSURE PHOTOGRAPHY*
• From the basics to more advanced techniques in combining still shots with Long Exposure Photography.
• Specific art tips for Long Exposure photography.
• Joel will be teaching his advanced techniques in B&W post processing using Silver Efex Pro 2 software.

PORTFOLIO REVIEWS
• Bring your own previous work for evaluation and constructive critique.
• Up to three weeks of post course online help and guidance of your photographs.

LEARN HOW TO USE YOUR DSLR TO CAPTURE MOTION PICTURES WITH CINEMATOGRAPHER +Armand Dijcks :
Cinematographer/photographer +Armand Dijcks will introduce you to the world of DSLR cinematography. Your DSLR camera is capable of capturing very high quality video images, but there are so many new things to learn when creating moving images that it may seem daunting. Armand will explain the key concepts, building on the things you already know as a photographer, so that you can expand your creativity using this new medium.

A photographic experience never to forget; this event will be recorded on video in documentary / fine art style, by one of the most talented and upcoming cinematographers +Armand Dijcks

SIGN UP HERE – LIMITED AVAILABILITY!
Click HEREhttps://docs.google.com/spreadsheet/viewform?formkey=dEtneDE4VmlVWXpGNy1wSnJZRnM4Tnc6MQ to Register

*Course Fee: 975USD (does not include flight or accommodation).  Detailed routes, schedule, and hotel recommendations will be revealed soon.
** A final video tutorial and ‘out in the field’ instructional sessions documented throughout the course will be provided free of charge to all participants.
* Maximum of 30 participants.

Contact Info:
Daniel Portal (General Inquiries): dportal@gmail.com
Joel Tjintjelaar: info.bwvision@gmail.com
Sharon Tenenbaum: sharon@SharonTenenbaum.com

REFUNDS AND CANCELLATIONS:
All payments are refundable upon request of cancellation (except a $50 processing fee and the Paypal fee of 2.9%). Cancellations (except mentioned fees) are in full up to 90 days prior to departure. Cancellations between 89 and 60 days prior to departure are subject to 50% of total in charges, between 59 and 30 days, 75% and no refunds will be issued with 29 days or less of notice. If payment is not received in full 90 days prior to departure we cannot guarantee your spot on the workshop. Any participant wishing to register in full can take that spot.   In the event of low registration the event will be cancelled.  In this event fees will be refunded in full.104    27 Powered by socialditto

Photography Should be Fun

July 5, 2012 by Charles Payet

On a personal level and in a break from the serious nature of my last few postings, I want to discuss a very serious topic, which is namely this:

Get Out There and Have FUN with your Camera!

In all seriousness, photography has become one of my most-enjoyed hobbies ever, and it is both a fun challenge and just pure enjoyment to get out the camera and gear and go shoot with no purpose in mind but to have FUN!
As it happens, there are 3 places where I’ve nurtured the enjoyment of photography, while learning some of the finer points of both shooting and post-processing images, usually with Adobe Photoshop Lightroom and Photoshop CS6; these days, I’m also experimenting with Nik’s software, such as HDR Efex 2, Silver Efex 2, and a couple others.  These 3 places are:

  1. The Aspiring Photographer’s thread on DentalTown (you have to be a dental professional to be a member)
  2. The FredMiranda.com Landscapes forum
  3. Google+

In the year since Google+ launched, it has become one of the biggest worldwide communities of photographers, and it is amazing to see the talent shared there.  I do find that FredMiranda.com is a better place to receive constructive critique, because it’s easier to be noticed there if you start a thread, while it’s easy to be buried in the constant stream of photos, and you need to be noticed and circled by enough people to have your images spread, but still…….G+ is great.

The Google Plus One-Year Photowalk

June 30th, 2012 happened to be the Google+ One-Year Anniversary, so a man named Thomas Hawke started the idea of a worldwide Photowalk to be held that day, and the response was phenomenal!  Here in Charlotte, NC we had nearly 20 people show up, which was even more remarkable given the 100-105 degree temperatures.  Getting together with a bunch of other people, none of whom I’d met previously, ended up being a lot of fun and pushed my photographic limits, as I’ve never done much architectural or street photography.  But here are a few shots from that blistering Saturday evening:

If you’re paying attention, you’ll notice that I have not placed any watermarks on these photos.  Given my recent blog posts, you may wonder why, and there’s a fairly simple reason….I’m just not worried about anyone stealing these images.  Naturally, I would prefer that they not, but none of these shots is likely to be worthy of selling prints or otherwise being highly valuable.

But the real message: if you want to get GOOD at photography, and if you want to learn the most about it, get the camera out of the office and go shoot some stuff besides teeth!

Please share links to your own photo galleries, websites, or tell me what you enjoy shooting outside the office in the comments.

Watermark Your Photos To Prevent Theft

June 29, 2012 by Charles Payet

In my last blog post about adding copyright information to your dental photos as a way to deter online theft of your work, the tutorial covered how to use a Metadata Template in Adobe Photoshop Lightroom to add identifying information to every photo.  This embedded information can be read by anyone who knows how to look; if they know, they may also know how to remove it (takes a little work), but a thief will probably move on to easier-to-steal photos instead of doing the extra work.  Another step you can take, also easy to do in Lightroom, is to add a Watermark, and that’s what this tutorial will cover.

Why Use a Watermark?

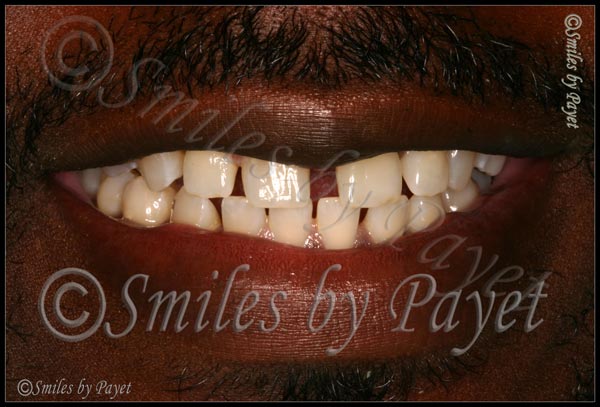
As seen in the example above, a watermark is typically a logo, symbol, or other mark that is placed somewhere on a photos that identifies it as belonging to someone, in this case, anyone seeing this photo knows that “Smiles by Payet” has copyrighted this image.  It’s pretty easy to see, and again, it may act as a deterrent to online theft, because anyone wanting to use it to represent their own work would have to laboriously edit the entire logo out of the photo.  Yes, I overdid it just a teensy little bit to make my point, and no, I would never ruin a photo to this extent with such tasteless work, but you get the point.

The tricky part in using a watermark, as you can probably see, has to do with 3 issues:

  1. Placement
  2. Size
  3. Opacity

While the point of a watermark is to protect your image, the point of your image is to showcase your work to existing or potential patients, with the goal that they will be impressed and call or schedule their treatment with you, not someone else.  Poor placement of a watermark can ruin the whole image and defeat the real purpose of the image, so please…..be tasteful about it.

Watermark Size, Placement, and Opacity

For maximum protection (my opinion only), I recommend creating a very large watermark that can be placed directly across the middle of the photo, but making it highly translucent, thereby not covering up what you want to show.  Doing so makes removal far more difficult for anyone wanting to steal your photo, unless they are highly skilled in Photoshop, and you generally can still see the photo well.

For the most tasteful protection, but the least effective, a small but fully opaque watermark can be placed in a corner.  It’s the least effective simply because it’s the easiest to remove, especially with the “Content-Aware Fill” and “Content-Aware Healing” tools available since Photoshop CS5 and now CS6, but if you don’t like the watermark obscuring the image, it’s still better than nothing.

Personally, I’m still experimenting on my own watermarks, and if you want some of my different tries, check out some photos on both my Charlotte dentist office website and my personal photography website:

Smiles by Payet Dentistry
CDPayet Photography

How to Create a Watermark in Lightroom

In Lightroom, you can create either a Text or Graphical Watermark; as a general rule, I suggest the Text Watermark for one main reason: it’s a LOT EASIER.  And here’s just how easy it is to create with 2 easy-to-understand screenshots.

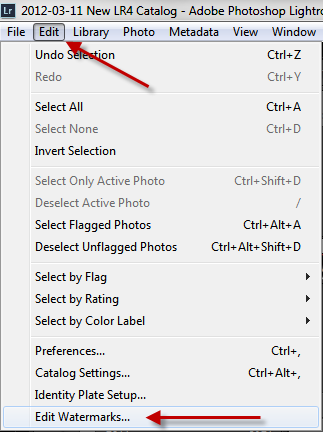
Step 1: Go to the Edit option on the top menu, then scroll down to “Edit Watermarks”
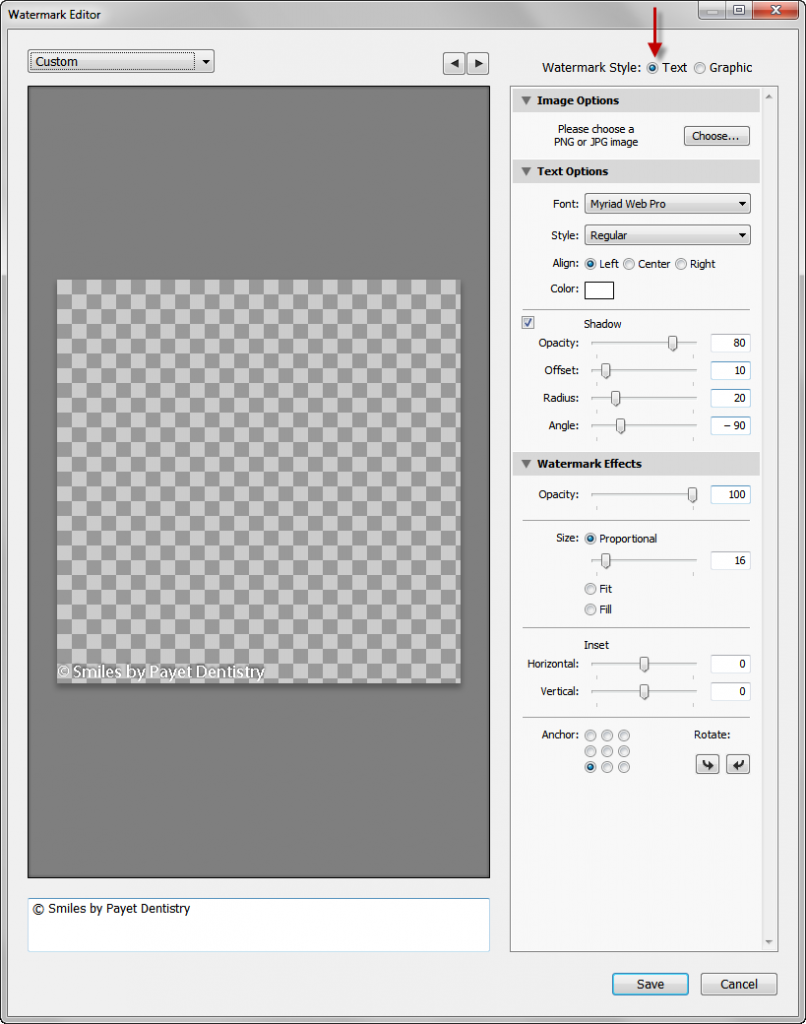


Step 2: At the lower left is where you’ll type in the text for your watermark.  The easiest way to get that (C) symbol is to open MS Word, type in the left parenthesis – capital C – right parenthesis and it will automatically convert it for you.  Then just copy/paste it into the text box.


Step 3: Experiment!  Seriously!  You can see all the options on the right side – play around with them, see what you like, what you don’t like, and as you change things, you’ll see the preview change instantly.  Change the text color – font – size – opacity – placement, etc.

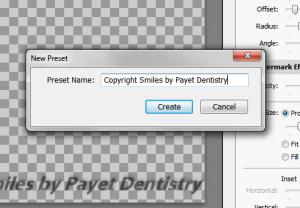
Step 4: Name Your Preset

And you’re done!


Coming up next – how to apply a watermark to your photos during the Export process.


More Info on the Importance of Copyrighting Your Images

June 22, 2012 by Charles Payet

After my recent blog post on why embedding copyright information into your photos is so important, I was doing some additional reading on my Google+ Stream and came across this really useful and important video on why it’s so important to actually copyright your images, as well as how to do it.  I learned a lot and need to take some additional steps myself based on what I learned…..check it out!

I will find more resources on the actual process of submitting your images for copyright protection in the very near future, as I’m learning a lot of valuable information in the process of writing these articles.

Image Copyright Protection

June 13, 2012 by Charles Payet

Ever worry that an unscrupulous web designer, colleague, or ad company might steal your images from your Facebook page, website, or other online source?  If so, read on to learn some easy ways to help protect your work, provide legal coverage if necessary for action, and how to find out if your photos have been stolen.

Has Your Photography Been Stolen Online?

To my knowledge at this time, I’ve never had any of my online photos “stolen,” by which I mean no one has downloaded or “hot-linked” them for use on their on website or in other marketing media.  That’s not to say it hasn’t happened, it just means I’ve never found any examples, because I don’t spend the time searching to find out.
Online Image Protection Has Limits

First off – if someone is REALLY determined to steal your photos, it is virtually impossible to stop it.  Sure, there are ways to add “right-click” protection to stop the easy “save as” copying, and there are ways to hide the image file location to prevent someone using an HTML embed, but in the end, there are far more ways being created on a daily basis to get around them than there are ways to stop them.  If hackers can break into major corporations and government agencies…….well, you get the idea, right?  But since it’s unlikely you’re up against that kind of firepower, mostly you’re looking to keep unethical web designers and colleauges from using your work to advertise themselves.  Fortunately, there are some easy and fast steps to do this with Photoshop Lightroom, and the best part is that, while the initial set-up takes a little time, after that it is virtually automatic and needs no more than a couple mouse-clicks…..seriously!

Creating Copyright Metadata Templates

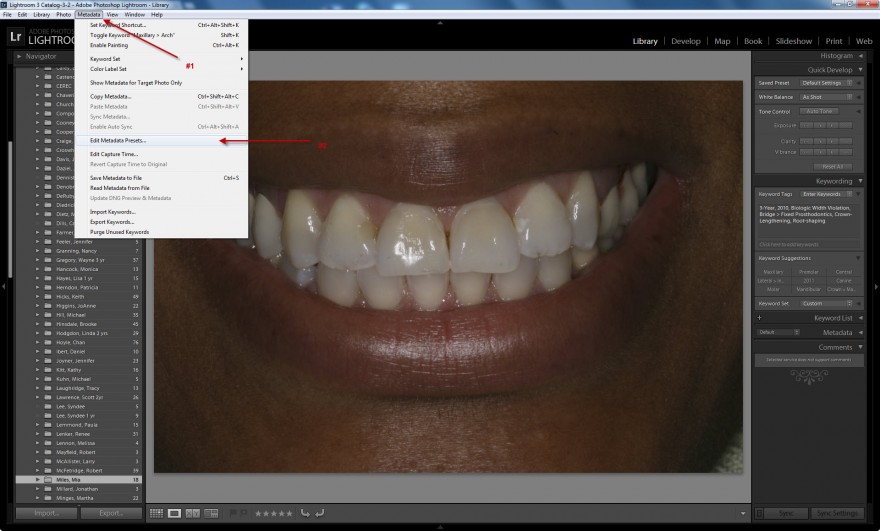
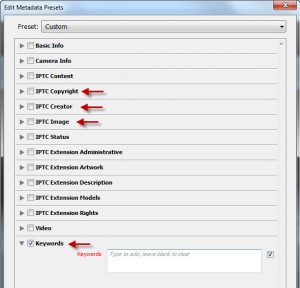
The first step is to create a Metadata Template that can be embedded into your photos.  Start at the Menu by choosing Metadata > Edit Metadata Presets, and you’ll see the following Dialog Box pop up (click for a larger view):


You don’t need to complete everything – total overkill.  The ones you do want to complete are the following sections, and at the end of this article you’ll see a set of screenshots of the information I include.
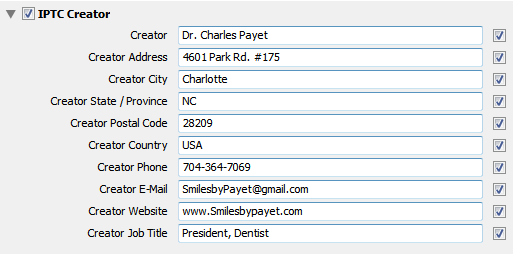
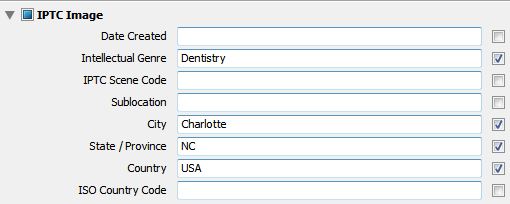
  • IPTC Copyright
  • IPTC Creator
  • IPTC Image (parts of it)
  • Keywords

Click the little arrow next to each section, and once you’ve filled in your information, you’ll save this as a new Preset; the easiest thing to do is call it, “Dr. So-and-So,” where you fill in your name.


Applying a Metadata Preset

Once you’ve created your Preset, you have 2 options, and I recommend you do both to be on the safe side:

  1. Apply that Preset to photos already in your Image Catalog, and
  2. Set this Preset to be automatically applied whenever photos are imported.

To apply the Preset to existing photos, it’s almost ridiculously easy.  Simply select all the photos to which you’ll apply the information, and go to the Right Sidebar of the Library Module > Metadata.  When it opens, click on the “Preset” location and choose the Preset you created.  You’ll be asked if you want to apply it to just the selected photos, all photos, or another combination.  Select “All Photos” And BAM!  You’re done with applying that information to photos you already have.  Easy, huh?

When you’re ready to import new photos, it’s about this easy, too.  Choose Import and select the source from which you’ll be importing the photos, most likely a memory card.  Again in the Right Side Toolbar of the Import Dialog, you’ll see a tab titled “Apply During Import.”  Directly under that, you’ll see an option to select a Metadata Preset.  Do that, and once you’ve chosen the folder to which you want to import, click Import.  And BAM!  Every photo imported from now on will have that information added to it, unless you change that import option.

Ensure the “Right” Metadata Stays During Export, But Don’t Violate HIPAA

There are a couple items to be sure of when exporting images for use on your website, on a social media platform such as Facebook, etc:

  1. Do NOT include your patient’s name in the file name or keywords (DUH!)
  2. When using a Publish Service or Export dialog, make sure to NOT strip out the metadata
Suggested Metadata to Include

The following are taken directly from the template I have created within Lightroom at my office; for my personal photography, I obviously use different information.

Because this post ended up longer than anticipated, look for an upcoming post on how to easily apply a Watermark with Lightroom.

If you’ve ever had someone steal your photos, I’d love to know how you found out and what you did about it in the Comments below!

  • « Go to Previous Page
  • Go to page 1
  • Go to page 2
  • Go to page 3
  • Go to page 4
  • Go to page 5
  • Interim pages omitted …
  • Go to page 10
  • Go to Next Page »

Copyright © 2025 · Atmosphere Pro on Genesis Framework · WordPress · Log in


Loading Comments...