• Skip to main content

Digital Dental Photography

Digital Photography and Workflow for Dentists

  • Home
  • Gear
    • Accessories
  • Clinical Dental Photography
    • Basic Settings
    • Patient and Camera Positions
    • Quadrants and Occlusals
    • Extraoral Photos
  • Software
    • Photo Organization
  • Portrait Photography Basics
  • Dental Websites
    • WordPress Websites
  • CE Reviews

Charles Payet

Finally Getting to Take Pictures Again!

August 30, 2011 by Charles Payet

Over the last 18 months or so, I have been working so hard on my dental practice, and my websites, that I’ve had little time to actually be a photographer, which is truly a passion.  The last time I got to do any real shooting was when we took a family vacation to Hawaii in April 2010, but even that was just snapshots of a vacation, not planned, scouted, and visualized in advance for the best shots.  But that is about to change!

My Passion for Photography Outside Dentistry

A few years ago, I came upon a fabulous photography forum: FredMiranda.com.  A free site (you do have to sign up to post photos, but there are no fees for most things), they have a wide variety of forums, from weddings to landscapes to sports to wildlife, etc.  I learned a tremendous amount just by reading and viewing, then gathered the courage to post some photos and received some very constructive critique.

One photographer, whom I came to greatly admire, is Mark Metternich, and you can see his landscape photography on his website: WildforLight.com.  Around the end of 2008, I was exploring the idea of supplementing our family income with some photography (back in the midst of the economic crisis, anything seemed like a good idea!), and Mark was kind enough to spend some time with me on the phone, explaining some possibilities.  It didn’t pan out, but he did push me to start building my own photography website, www.CDPayetPhotography.com.

Landscape Photography Expedition in Oregon

Mark also told me that he does photography tours of the Southwest and the Northwest, and the idea fascinated me.  To spend an extended time totally devoted to landscape photography…..back in those days, it was a pipe dream for financial reasons, but the dream took hold, and it became a real goal to make it happen.  And earlier this year (spring of 2011), the time was finally right to make a commitment and schedule a trip, so I called Mark up and said, “Let’s do it!”

This coming Friday, September 1st, I will be taking off for Portland, OR, to be picked up by Mark, and we will be heading out for a full week of landscape photography at a level that I have never before reached.  I am so incredibly excited, I can barely make it through the next 2 days of work!

I don’t know if we will have much in the way of Internet access, and I don’t plan on taking a laptop this time, so I’m not sure yet if I will be able to blog my way (with photos) through the trip, but I am going to try.  If not, I’ll be doing a huge amount of post-processing for weeks afterwards, and I do plan on using this as a place to share (partially because I am going to be testing out some new WordPress photo gallery plugins).

Google+ Is the New Photography-Sharing Site

Is anyone else on Google+, their new social media platform?  If you are, it is rapidbly becoming a photographer’s dream – there are some amazing photographers on there!  If you’re interested in joinging Google+, please give me your email, and I’ll be glad to send you an invitation.


Taking a Short Break

May 19, 2011 by Charles Payet

Dear fans, friends, and visitors:

Due to some recent issues arising in my practice, I am taking a short (hopefully only a month or so) sabbatical from my work here on DentalDigitalPhotography.com.  Nothing horrible, don’t get me wrong, but my practice is my top priority in order to provide a living for my family, and there’s just a lot of work that must be done in a short period of time to re-solidify the progress we’ve made over the last 18 months there.

So don’t worry, I shouldn’t be gone long, and then I’ll be back.  😀

Photosmith iPad App Syncs with Lightroom

May 1, 2011 by Charles Payet

Ever since the iPad was released, many apps have been developed for photographers, but none have had much real editing functionality, nor the ability to easily work with desktop photography software.  The Photosmith app is finally a real sign of change, and for dentists, this will be terrific.  With the Camera Connection Kit, here’s all you have to do:

  1. Take the pictures with your DSLR;
  2. Plug the camera into the iPad with the Camera Connection Kit
  3. Open the “Photos” app and import all the pictures (or just selected ones)
  4. Open (or switch to) the Photosmith for iPad app
  5. Show your patients
  6. Create folders, add color or star ratings, keyword tags, other info
  7. At the end of the day, sync all the pictures to Lightroom and it keeps all that info!

Press Release


Photosmith brings Lightroom synchronization to the iPad

Photosmith introduces sorting and tagging to photographers on the go

Atlanta, GA. April 26, 2011 – C Squared Enterprises, Inc has released Photosmith for the iPad. Photosmith brings the ability to manage photos using collections, keywords, tagging, ratings, EXIF, and IPTC metadata. Photographers no longer need to wait until they get back to their main computer or drag a laptop to sort through photos or show clients their latest results. With Photosmith, photographers can load their photos directly on the iPad, filter, sort, rate, and keyword while in the field/studio. When they get back to Adobe Lightroom on their Mac or PC they can sync all photos from the iPad to Lightroom and all of their tagging and rating will also transfer with no need to duplicate effort.

Photosmith improves the photographer’s digital workflow, especially flows with RAW images. Photosmith offers viewing of full RAW image data from the latest dSLR cameras in full fidelity and up to 100% zoom; even on 25+ megapixel images. Photosmith offers a grid view for quickly sorting through thumbnails and collections, a loupe view for viewing individual images and tagging, and a full screen view to maximize use of the screen. Users can assign a rating, choose a color label, view the basic EXIF data (shutter speed, ISO, f/stop, and more), or edit the title, caption, or a number of other IPTC fields. All these settings are synchronized with Lightroom using the free Photosmith plugin. Future changes made in Lightroom are saved back to the iPad during a sync as well. See more at: http://bit.ly/PhotosmithTour

Photosmith assists photographers on the go with sharing their photos too. Photos can be sent to Flickr, Facebook, Dropbox, or email. Those sent to Flickr and Facebook maintain their titles and keywords, allowing pros to quickly share and get feedback from their clients, or allows the causal photographer to share photos while on vacation.

Photosmith is the culmination of 24 months of effort and development continues to add new features over time. Users are encouraged to submit feedback and suggestions to help drive the future of the app.
The app is available worldwide for US$17.99 (or the approximate equivalent).

For more information please visit http://www.photosmithapp.com

Boosting Your Web Presence with Image SEO

April 2, 2011 by Charles Payet

Recently, in response to my post about improving patient communication by showing them their teeth, Sanjay Hirokedi asked if one can improve Google SERPs (Search Engine Results Pages/Positions) by optimizing images on Google Picasa, Flickr, Smugmug, and other online photo sharing sites, as well as your own dental website(s).  The answer is both simple and complex, but the basic answer is YES, you can improve your Google SERPs by optimizing pictures.  Here’s a little bit of how and why:

Content (including Pictures!) is King for Google, Bing, Yahoo

When it comes to the best way to improve your web presence in the search engines, always remember this motto: CONTENT IS KING. Search engines are all about relevent content, not just fluff, so besides linking strategies, proper use of headline tags (h1, h2, h3, etc), and other techniques, what you really want is information that your prospective patients are seeking. And yes….patients love to see pictures, because they’re easy to understand.  So if you know how to add the right information to your pictures in the code “behind” the pictures, you can tell the search engines that your pictures are relevant, and the pictures will be indexed and findable in searches.

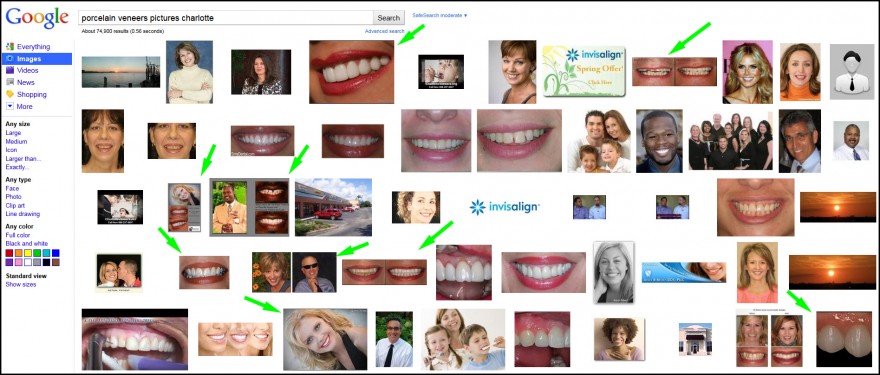
As an example, I did a Google Images search for “porcelain veneers pictures charlotte,” and this is what came up.  All of the pictures with a green arrow by them are from one or more of my websites, and if you were to do a similar search, then hover your mouse over each image, it would pop up for you to see from where Google found it.

(click for a larger version)


Keywords in the “Alt text” and File Names are SEO Tools

When looking at the code for a picture online, you would see something like this example:

<img src=”images/cindy-after-8-veneers.jpg” alt=”After picture of Smile with 8 Porcelain Veneers” height=”169″ width=”300″ />

The yellow highlighted text is the file name, and as you can see, in the file name itself, I have included some words people might use to search, “8 veneers,” and “after.” I didn’t put the word “picture” in, as Google already knows it’s a picture, so it’s a bit redundant.  DO NOT use file names like those that come from the camera, i.e. “_MG_9804.jpg,” as that has no meaning, and no one will ever search for a dentist with that, I promise!

The green highlighted text is what is called the “alternate text” of the picture, which is used by search engines for several purposes, but for our purposes, there is 1 very important one:

  1. Relevant content – again!  “After picture,” “smile,” and “8 porcelain veneers.”  Right back to the most important part of all SEO – RELEVANT CONTENT.  When you add the right alternate text, with appropriate keywords, you are telling the search engines what the picture is about.  Using a boring file name like _MG_9804 tells the googlebots absolutely nothing about the picture, so it’s irrelevant.  But keywords?  Bingo!

To be honest, these aren’t even the best file names and alt text that could be used; they’re from a website (TheCharlotteDentist) I haven’t updated in quite a while.  For a far more detailed explanation of how to properly use keywords in file names, alt text, etc., I highly recommend The Website Owner’s Manual for Dentists, by Dr. Mike Barr.  At only $347, it will be one of THE best purchases you will ever make for your dental practice if you have a website.

Important Note: everything you just read applies equally well to social media sites AND your own practice websites!

Social Media Sharing of Pictures: Which Work Best?

This topic is now moving into the realms of the more speculative, because while there may be books and/or research that has done real comparisons among the different social media photo sharing sites, I don’t know of it, and I don’t really have the time to look.  Just so you know.  😉  Therefore, what I am about to share with you is based exclusively on my own experience with the following 4:

  • Flickr (a bit more than beginning, but learning a lot these days)
  • Google PicasaWeb (beginnger/intermediate)
  • Facebook (intermediate level of experience)
  • SmugMug (reasonably advanced user)

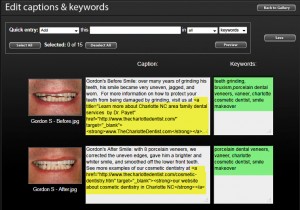
How the SmugMug photography sites make it easy to add keywords and descriptions for search engine optimization.As can be seen, I have the most experience with SmugMug, with which I built my photography website.  I do pay the $150/year fee for a PRO version because of some important features if you want to sell pictures, as I do, but most of you won’t need to do that.  However, if you do, email me for a Coupon Code that will save you some $$ on any level subscription.  😀

I really like the layout that SmugMug provides for editing the captions and keywords of large numbers of photos at once, as seen here for the following reasons:

  • Add keywords to a lot of pictures all at once or individually
  • Plenty of space in the keywords/phrases section to see ALL of the ones you’ve added at once
  • Ability to add hyperlinks (for example, to your website page on cosmetic dentistry, or CEREC, whatever) in the Caption/Description
  • Neat, organized layout onscreen

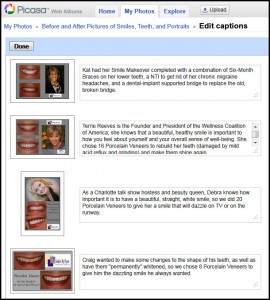
Screenshot demonstrating Flickr's layout for adding keywords and descriptions (alt text) to photos for SEOFlickr is reasonably close in ease of use, but the things I don’t like about their batch editing section are:

  • No way to add the same keyword to a lot of pictures at once
  • No ability to have hyperlinks in the description/caption
  • Not as neatly laid out onscreeen
  • The line to add keywords is just 1 line high, and you can’t see all the keywords/phrases at once.


Facebook has a pretty easy-to-use layout, too, but it has some VERY distinct disadvantages that bug the heck out of me:

  • It does not allow you to add distinct keywords, just a caption/description for each picture
  • No hyperlinks in the captions
  • You can only get to it when initially uploading pictures to an album!  YEESH!  And that’s why I don’t have a screenshot right now, ’cause I don’t need to add any pictures right now.  I’ll add it later.

Lastly, Google PicasaWeb is about on the same level as Facebook, although it does allow you to add keywords distinct from the descriptions, but as with Flickr, not as easily, and not to more than 1 picture at a time.

Google does have 1 VERY distinct advantage, though: it’s part of Google!  Naturally, any photos added to Google’s PicasaWeb will be indexed rather quickly.  Whether or not this affects their findability?  I don’t know.


Add Keywords in Adobe Lightroom Before Uploading

While you can’t add a long caption within Lightroom, you CAN add all the keywords and phrases you like before you ever upload them, assuming you are using any of the Export or Publish features.  There are also Lightroom plugins that allow you to upload and keep track of the uploaded pictures right inside the program, as I described when talking about Jeffrey Friedl’s LR plugins for social media exports.

So when all is said and done, is it worth it to use photos to improve your website optimization?  ABSOLUTELY!  The pictures alone won’t do it, but they can, and should, be an important part of building your web presence, and online photo sharing sites can also help.

Who’s going to Townie Meeting 2011? Wanna “shoot” Vegas @ Night with me?

March 31, 2011 by Charles Payet

OK, anyone else going to be at the Townie Meeting 2011 in just another 5 weeks?  I am really looking forward to it, as this is my first time back since 2005.  My wife is coming, too, as there are plenty of Townies who want to meet the woman who, quite literally, helped save my dental practice and turn my life around. It will even be a sort of 5th Wedding Anniversary trip for us.  😀

Naturally, with my wife along, and with all the great courses being given by some phenomenal lecturers, there won’t be a lot of free time, even in the evenings, but one thing I REALLY want to do is spend some time one evening walking around the Strip shooting pictures.

The only “requirements/suggestions:”

  • A camera and plenty of memory on the cards
  • A tripod in case you’re too tipsy to hold the camera steady from all the parties
  • You want to have fun taking a ton of pictures!

Adobe Lightroom Export Plugin to Facebook Fan Pages

March 19, 2011 by Charles Payet

For a long time, one small barrier has kept me from uploading a lot more photos to my office Facebook Fan Page: Facebook.com/TheCharlotteDentist, and that is the simple fact that Lightroom did not have the ability to upload directly (no Publish Service) to Fan Pages — only to Personal Pages.  I had to export the pictures from Lightroom to another folder, THEN go to Facebook and upload them from there.  Not that it is a lot of work, but it required more steps than how easily I can Publish photos to my SmugMug photography site, CDPayetPhotography.com, where I have photo galleries of 6MonthSmiles Invisible Adult Braces patients, porcelain veneer before/after pictures, and more.

Jeffrey Friedl’s Lightroom Plugin Exports Directly to Fan Page Albums

Well, tonight (March 20th, 2011) I was researching some material to put in my upcoming Townie Meeting 2011 lecture on dental digital photography workflow, and through various roundabout ways, I ended up back on the blog of Jeffrey Friedl, who has been creating and updating highly functional Adobe Lightroom plugins for as long as Lightroom has been around.  And I happened to read this very exciting statement:

Note: as of version 20110116.147, the plugin can upload to albums on fan/group pages.

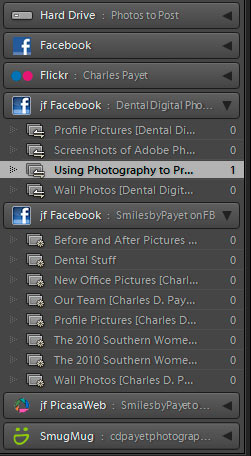
Dentists can easily export pictures to the office Fan Page with this Adobe Lightroom plugin.Needless to say, I immediately downloaded the new plugin and registered it (it’s Donationware, which means it is “almost” free, which means all you have to do is pay the minimum 1 US penny via PayPal for unlimited registration/use of the plugin) with a $20 donation.  With just a minute needed to authenticate to Facebook, suddenly I had the easiest way possible to send all the pictures I could want directly to Facebook and even keep track of them within Lightroom.  You can even set it up for multiple Fan Pages, as I’ve shown here.

I highly recommend Adobe Photoshop Lightroom for dentists, and with this Facebook plugin, it became an even better option, given how important Social Media is becoming in promoting our dental practices.

  • « Go to Previous Page
  • Go to page 1
  • Go to page 2
  • Go to page 3
  • Go to page 4
  • Go to page 5
  • Go to page 6
  • Interim pages omitted …
  • Go to page 10
  • Go to Next Page »

Copyright © 2025 · Atmosphere Pro on Genesis Framework · WordPress · Log in


Loading Comments...