• Skip to main content

Digital Dental Photography

Digital Photography and Workflow for Dentists

  • Home
  • Gear
    • Accessories
  • Clinical Dental Photography
    • Basic Settings
    • Patient and Camera Positions
    • Quadrants and Occlusals
    • Extraoral Photos
  • Software
    • Photo Organization
  • Portrait Photography Basics
  • Dental Websites
    • WordPress Websites
  • CE Reviews

Charles Payet

Photoshop Tip for Dentists – Remove Facial Hair and Skin Blemishes

February 13, 2013 by Charles Payet

While I do not believe it is ethical for dentists to use Adobe Photoshop to alter the appearance of their work, thus deceiving potential patients about what they can really offer, there are certain circumstances under which I believe it is not only acceptable to use Photoshop, but it may be absolutely necessary to do so.  Bear in mind – I NEVER condone the use of Photoshop to actually change anything about the treatment you provided for a patient – but AROUND your work it may be just fine.  In the following video tutorial for dentists on using Photoshop, I will demonstrate 2 techniques that you may find useful, which your patients will love, and which will enhance your photos for marketing purposes.

Use Photoshop to Remove Facial Hair

If you’ve done enough cosmetic dentistry and Before/After portraits, especially of women, you will almost certainly hear one or both of the following comments, which will always start off the same way:  “Of course you can put my portrait on the wall or your website, doctor, as long as you…..

  1. ….just get rid of all those wrinkles!” OR
  2. ….as long as you get rid of those moles/facial hair/sun spots!”

It doesn’t matter if the woman is 26 years old and the only wrinkles are in her imagination, if she sees her photo on your wall, website, Facebook page, etc. and hates it, you will never hear the end of it. Of course you should use a solid Photo Consent Form, but I always let a woman proof her final photo before I print it or put it on the wall; why take a chance?  Guys usually couldn’t care less, and let’s be clear….these tips should only be used for womens’ portraits 99% of the time unless a man specifically requests something.  

Photoshop Elements 11 or Photoshop CS6 ?

The video tutorial to follow is done in Photoshop CS6, and I’ve been using the full version of Photoshop (PS) since version CS2; prior to that, I used Photoshop Elements.  The current version of  Elements (PSE) is version 11, and it is a pretty powerful and very affordable program if you don’t want to spend the money on Photoshop, and you should be able to do these edits in PSE, too.  I just personally prefer the full version.  I find that Photoshop Lightroom (LR) is more intuitive program to learn, as everything is laid out more easily.

How to Reduce or Eliminate Unwanted Facial Hair, Sun Spots, and Moles

There are only 2 tools you will need for this exercise:

  • Duplicate Layer
  • Clone Tool on “Lighten” Mode or “Darken” Mode


Prepare Lightroom for 2013 Dental Photos

January 22, 2013 by Charles Payet

It’s the beginning of a new year, and if you haven’t already done so, it is time to create a new set of folders for 2013, and time to create a new Metadata Preset to be applied on import of all your photos.  Otherwise, you’ll be adding outdated metadata to your images and making your photo catalog less organized.  One side benefit of updating your Copyright Info in the Metadata Preset is this: if you upload any of those photos to your website, Google+ Local Page, Facebook Fan Page, etc., Google will recognize the year and know that it is new, fresh content.  And Google LOVES fresh content on websites!

Don’t forget to check out the short video tutorial at the bottom of the page, too!

Create A New Year Folder with Sub-headings

I’ve already discussed how I recommend organizing your Folder Hierarchy, and that hasn’t changed, although I changed a couple folder names this year, as you can see in this screenshot.  You can tell I did it before the end of 2012, as there wasn’t a single photo loaded into this year yet.

How to set up a folder hierarchy to organize dental photos in Lightroom

Of course, this is completely customizable depending on your procedure mix and desire to separate, or not separate them out as much as I do.

Create a New Copyright Metadata Preset for Import

To help protect your photos from online theft and misuse, make sure you read Image Copyright Protection; and now it’s time to create a NEW Metadata Preset.  Please DO NOT just “update” the one that you have; if you do so, every image to which you had applied the old one, i.e. for 2012, will now suddenly read as if it were taken in 2013 instead, which is wrong.  CREATE A NEW PRESET!

To do so, you must first be in the Library Module, then go to “Photos > Edit Metadata Preset” and you’ll come to this screen, and you can just enter the appropriate data for your practice.  As you can see at the bottom, in the box labeled “Keywords,” I’ve added just one keyword – 2013.  This is just to avoid having to add it to every photo.

What copyright metadata information to add to a Lightroom preset.

And you’re set to go!

Convert Film X-rays to Digital Photos

January 1, 2013 by Charles Payet

I was just asked a question on how to take digital photos of film x-rays in order to digitize them, and realized this is a frequent question on DentalTown that can easily be answered.  Fortunately, it’s quite easy!

How to Take Digital Photos of Film X-rays

There used to be some flatbed scanners available that could be used to scan individual x-rays, panoramics, and full-mouth series, but as I understand it, those are fairly expensive and not easy to find any longer, probably  because the demand wasn’t very high.  So if you want to digitize your old film x-rays to load into your PMS, whether for simple archiving and space storage, or to make it easier for your team to access them quickly, the easiest way to do so is using a DSRL.  Here’s what you’ll need to do, but bear in mind you’ll need to experiment a little due to lighting conditions in your office, and depending on the quality of the x-rays.

  • A DSLR
  • Camera and lens must be on Manual mode
  • An x-ray viewing box
  • You can change the camera to shoot in B&W, or you can change it later
    • I suggest leaving the camera on your normal color mode, as it’s REALLY irritating if you forget to change it back from B&W and take a whole series of shots in B&W that you didn’t mean to do.
    • If you shoot in RAW, as I recommend, it won’t make any difference anyway, it’s super-easy to change in Lightroom
  • TURN THE FLASH OFF!. This is really critical – the flash will ruin them all
  • TURN THE OPERATORY LIGHTS OFF
  • Shutter speed: 1/80
  • f-stop (aperture): 5.6
    • lower f-stops let in more light, and since the x-ray is flat, you don’t need much depth of field
  • ISO: 800
  • Zoom in as tightly as you can to minimize light around the edge of the x-rays.

As you begin taking your first photos, if you need to make some changes, here are some tips:

  1. If possible steady your hand on a counter to minimize hand-shake under the low-light conditions.
  2. When experimenting with settings, only change one at a time
  3. The first setting to experiment with is the ISO.  If the settings above give an image a little too dark, increase the ISO before changing anything else
  4. With cameras prior to 2010, ISO 800 may be the highest you can go without too much noise/grain appearing in your photos .
  5. With cameras from 2012 and on, you can probably go as high as ISO 2000 or even 4000 without much noise, but you won’t need to do so.
  6. The second setting to change if necessary is the f-stop.  Drop it lower (smaller number), but it will be a bit tougher to keep the image in focus if you get all the way down to f/2.8
  7. A shutter speed of 1/80 is probably the lowest you’ll want to go; much lower than that, and your hands will be harder to keep steady enough to prevent shake.

Good luck!  If you have other tips for successfully converting old film x-rays to digital, I’d love to hear about them, too!

2012 Ends and 2013 Begins

December 30, 2012 by Charles Payet

As 2012 is wrapping up, I thought I’d share one particular graphic from my annual WordPress.com report received today, as it is just pretty darn amazing to me and really illustrates the power we have to reach the world through the Web.  The graphic sums it all up – 147 countries!

Internationally-read blog about dental digital photography by Charlotte NC dentist Dr. Payet

Lightroom Smart Collections Make Photo Selection Easy

December 2, 2012 by Charles Payet

Have you ever wanted to find some patient photos from several years ago, but couldn’t remember the patient’s name?  Maybe you’re updating your website with some new photos, and it was a great veneer case, but the patient moved away, and you’re completely stumped?  Especially if you’re using your Practice Management Software (PMS), this becomes a virtually impossible problem to resolve. So how do you manage this?

Adobe Lightroom Smart Collections for Dentists

lightroom smart collections automatically collect photos by keyword
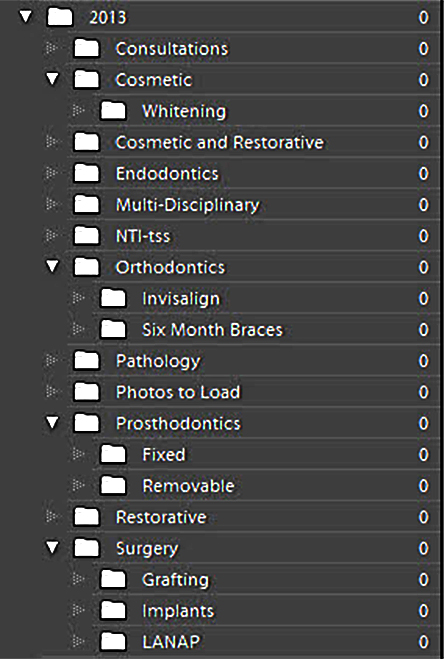
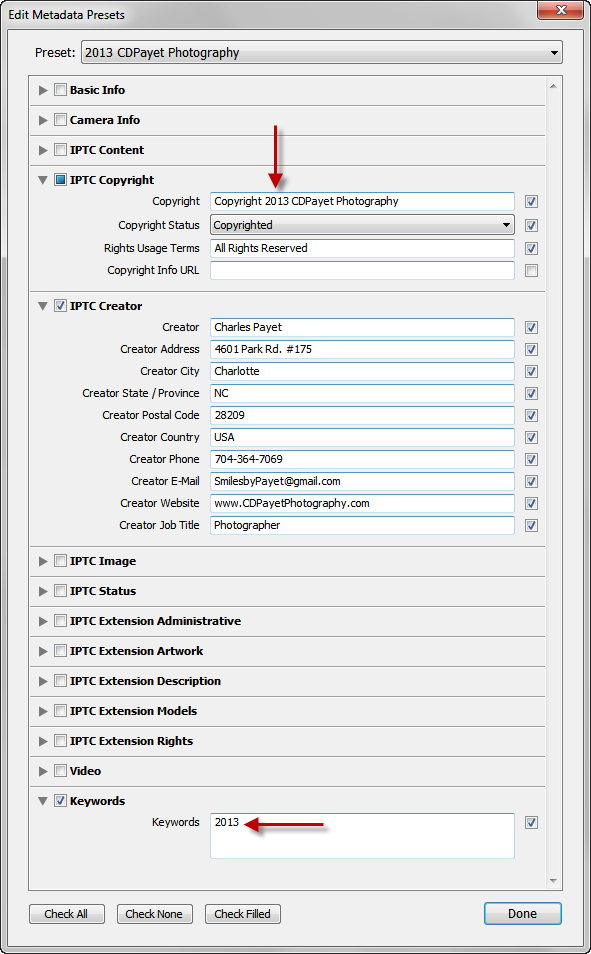
One of the most powerful and useful tools for dentists managing their dental photography catalogs, is the Lightroom Smart Collections feature.  Based (usually) on keywords that you’ve assigned to your photos, whether on importing them or adding them later, Smart Collections automatically collect all photos with a given keyword.  You can also create Smart Collections to collect photos with a certain Rating (1-5 stars), Color Label (red, green, yellow, purple, blue), Metadata (date taken, GPS location if your camera has this feature, etc), or even combinations of criteria.

Keep Your Patient Photos Well-Organized

I’ve already discussed a basic structure for organizing dental pictures previously, and as long as you remember the year and procedure type, this can be an easy way to find a patient, because that name should show up in the list of patients under that procedure.  However, if you’ve been practicing long enough and taking enough pictures, this is not always easy.  Where I live, Charlotte NC, is a highly transient area, with lots of professionals moving into and out of town, so we tend to have high patient turnover rates.  In addition, we often have patients driving long distances for our unique combination of services, including LANAP Laser Periodontal TherapyTM, Six-Month Braces, and Cerec Same-Day Crowns, and those patients return to their regular family dentist after their treatment with us is complete.  It’s hard to remember patients we don’t see regularly, right?

Setting Up Your Smart Collections

When thinking of all the possible ways and combinations you could set up Smart Collections, the enormous possibilities can seem daunting.  Remember, though, you only need to do this for image sets that you really want to track over time.  This type of organization is very useful for dental lecturers and for anyone wanting to use your own photos in your marketing.  Theoretically, this might include sets as follows:

  • Dental Implants
    • Straumann
    • Implant Direct
    • Blue Sky Bio
  • Porcelain Veneers
  • Crowns
    • Lab-made
    • Cerec
  • Whitening
  • Six-Month Braces
  • Invisalign
For example, since I’ve started taking photos through my Leica M320 Dental Microscope, I use a Smart Collection based on the keyword “microscope” as an easy way to sort out those photos taken through the scope, rather than with the conventional DSLR set-up.
Smart Collections Save Time

If you’re anything like I am, with a dental photo catalog of nearly 65,000 images over the last 8 years, and you want to find photos of a given subject, without having to remember every patient name and sort through them all, Smart Collections are the way to go.  Because they  AUTOMATICALLY collect every photo in your catalog with the criteria you select, they’re a huge time-saver.

Learn to use Adobe Photoshop Lightroom Smart Collections, and you’ll make your life so much easier, any time you need to find one or more photos, but don’t remember the patient’s name, or if you want to find photos from a lot of patients of a certain procedure, material, etc.

Please let me know in the comments if you have any questions, or if you’ve found other easy ways to organize your photos!

Why I Chose a Leica Dental Microscope

November 6, 2012 by Charles Payet

I recently published an article on Dental Operating Microscopes for General Dentists and a lot of the factors to consider when choosing one.  In this post, I’ll discuss why I personally chose a Leica M320 Dental Microscope.

To Choose a Scope, Get a Demo

After having used a rented Zeiss OMPI Pico 5-step DOM for 3 years, in 2012 it was time to finally purchase my own.  In fact, we needed 2 scopes to continue our growth, as it was very limiting to only have 1 op to schedule many procedures.  With a lot of changes in technology over those 3 years, I knew it was important to do demos again.

I was able to schedule demos with Leica, Zeiss, and Seiler; I was not able to contact anyone with Global, but had demo’d a Global G6 in 2009 during my initial scope trials.  The Zeiss that I’d rented had a halogen light source, which is rather yellow in color and the least bright of all light sources available, and I wanted brighter.

I was able to demo a Zeiss with Xenon, Seiler Revolution with Metal halide, and Leica with Dual LED.  While each of them is an excellent scope in its own right, I ultimately chose a Leica M320, for the reasons listed below.

The Leica Advantages

  1. Up-Front Cost: in terms of cost, the Leica is not cheap – it starts around $23,000, and depending on the accessories you choose, it can get up to about $28,000.  This is obviously not cheap, and yes, I wanted the DSLR adapters for my Canon cameras for documentation.  However, this up-front cost is offset by a big cost-savings discussed below.
    1. In terms of purchase price, the Leica and and Zeiss are comparable when fully-equipped with accessories.
    2. For pure value, the Seiler is the clear winner.  Starting at just $16,000, and fully-equpped with accessories at $21,000, it is clearly the most affordable of the choices.  However, the light sources need replacing the most frequently, so over time the cost will go up.
  2. Dual LED lights: with the twin LEDs, the light intensity was IMO equal to the Zeiss Xenon.  In this regard, it is clearly superior to the Seiler metal halide, but I couldn’t compare it to the plasma source they’re introducing.  But seriously….the LED is incredibly bright.  For both still photography and video, you need bright light, because as the level of magnification increases, the amount of light entering the scope and reaching your eye decreases.
  3. Long-term Costs: this is where the Leica really stood out.  Everyone knows that LEDs are long-lasting, and the dual LED light bulbs on the Leica are rated at 60,000 hours.  I’d have to leave the bulbs on 40 hours per week, 52 weeks per year, for 28 years before they’ll need replacing! If I’m even practicing in 28 years (I’m 41 at the time I write this), I probably won’t mind the replacement cost by then.
    1. In comparison, a replacement xenon bulb on the Zeiss runs about $4500; say it needs replacing every 6 years and I practice another 25 years, even if the price drops, that’s another $24,000 just in light bulbs, which is the cost of a whole new scope!
    2. I’m not sure at this time what the Seiler Plasma pricing is (will see if I can find out)
    3. The Leica also has very few moving parts to be replaced, so again, repair costs should be extremely low and rarely needed.
  4. Size: I found the Leica to have the smallest “footprint” in the space above the patient, while still having excellent maneuverability and optics.
    1. The Seiler and Zeiss are quite similar on this point – definitely bigger.  Not a major deciding factor, because not a big difference, but it did come into play.

Factors That Didn’t Play a Role

Optics:I really don’t think there is a noticeable difference among the 3 I compared.  Leica and Zeiss are well-known and have long-established reputations for making exceptionally fine lenses for both scopes, and Seiler has established itself in recent years as making excellent glass, too.  My personal opinion is that very few people have the ability to distinguish among them, and optical quality is no longer a serious differentiating factor.The built-in camera on the Leica:  IMO it sucks.  If they didn’t have the DSLR adapter, I would never have considered the Leica at all for that sole reason.  That’s just my opinion, but when I compared the images taken with the built-in camera to those taken with my out-of-date but still 8MP Canon XTi, the XTi images clobbered the Leica camera.
The Leica M320 Dental Operating Microscope ROCKS!

I’ve been using my Leica’s for nearly 6 months now, and overall, I am extremely pleased.  I’ll be adding some more details of why I love them in a future post.  If you are looking at scopes, my personal recommendation right now is to seriously consider a Leica.

  • « Go to Previous Page
  • Go to page 1
  • Go to page 2
  • Go to page 3
  • Go to page 4
  • Interim pages omitted …
  • Go to page 10
  • Go to Next Page »

Copyright © 2025 · Atmosphere Pro on Genesis Framework · WordPress · Log in


Loading Comments...