• Skip to main content

Digital Dental Photography

Digital Photography and Workflow for Dentists

  • Home
  • Gear
    • Accessories
  • Clinical Dental Photography
    • Basic Settings
    • Patient and Camera Positions
    • Quadrants and Occlusals
    • Extraoral Photos
  • Software
    • Photo Organization
  • Portrait Photography Basics
  • Dental Websites
    • WordPress Websites
  • CE Reviews

Photography Software

Prepare Lightroom for 2013 Dental Photos

January 22, 2013 by Charles Payet

It’s the beginning of a new year, and if you haven’t already done so, it is time to create a new set of folders for 2013, and time to create a new Metadata Preset to be applied on import of all your photos.  Otherwise, you’ll be adding outdated metadata to your images and making your photo catalog less organized.  One side benefit of updating your Copyright Info in the Metadata Preset is this: if you upload any of those photos to your website, Google+ Local Page, Facebook Fan Page, etc., Google will recognize the year and know that it is new, fresh content.  And Google LOVES fresh content on websites!

Don’t forget to check out the short video tutorial at the bottom of the page, too!

Create A New Year Folder with Sub-headings

I’ve already discussed how I recommend organizing your Folder Hierarchy, and that hasn’t changed, although I changed a couple folder names this year, as you can see in this screenshot.  You can tell I did it before the end of 2012, as there wasn’t a single photo loaded into this year yet.

How to set up a folder hierarchy to organize dental photos in Lightroom

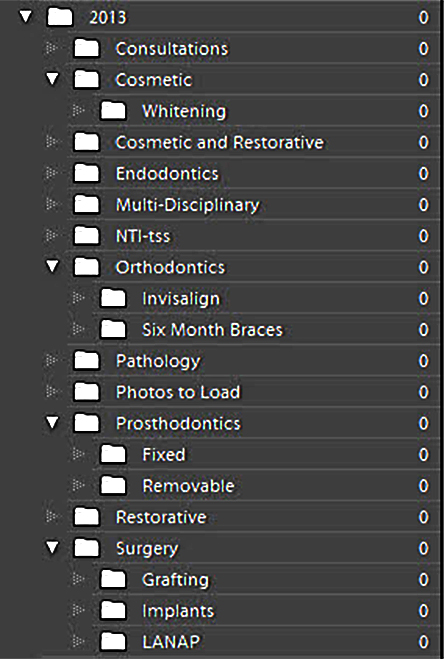
Of course, this is completely customizable depending on your procedure mix and desire to separate, or not separate them out as much as I do.

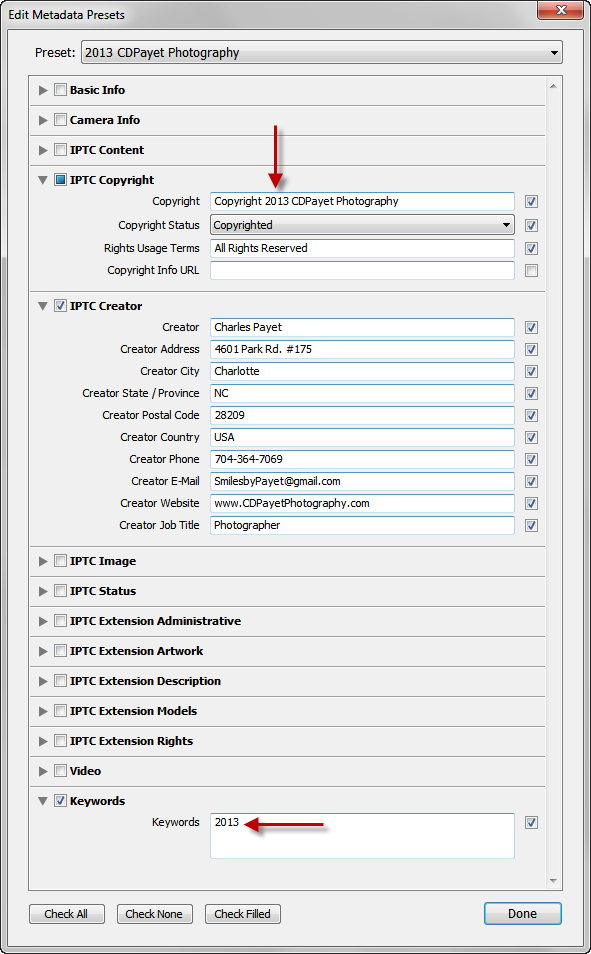
Create a New Copyright Metadata Preset for Import

To help protect your photos from online theft and misuse, make sure you read Image Copyright Protection; and now it’s time to create a NEW Metadata Preset.  Please DO NOT just “update” the one that you have; if you do so, every image to which you had applied the old one, i.e. for 2012, will now suddenly read as if it were taken in 2013 instead, which is wrong.  CREATE A NEW PRESET!

To do so, you must first be in the Library Module, then go to “Photos > Edit Metadata Preset” and you’ll come to this screen, and you can just enter the appropriate data for your practice.  As you can see at the bottom, in the box labeled “Keywords,” I’ve added just one keyword – 2013.  This is just to avoid having to add it to every photo.

What copyright metadata information to add to a Lightroom preset.

And you’re set to go!

Lightroom Smart Collections Make Photo Selection Easy

December 2, 2012 by Charles Payet

Have you ever wanted to find some patient photos from several years ago, but couldn’t remember the patient’s name?  Maybe you’re updating your website with some new photos, and it was a great veneer case, but the patient moved away, and you’re completely stumped?  Especially if you’re using your Practice Management Software (PMS), this becomes a virtually impossible problem to resolve. So how do you manage this?

Adobe Lightroom Smart Collections for Dentists

lightroom smart collections automatically collect photos by keywordOne of the most powerful and useful tools for dentists managing their dental photography catalogs, is the Lightroom Smart Collections feature.  Based (usually) on keywords that you’ve assigned to your photos, whether on importing them or adding them later, Smart Collections automatically collect all photos with a given keyword.  You can also create Smart Collections to collect photos with a certain Rating (1-5 stars), Color Label (red, green, yellow, purple, blue), Metadata (date taken, GPS location if your camera has this feature, etc), or even combinations of criteria.

Keep Your Patient Photos Well-Organized

I’ve already discussed a basic structure for organizing dental pictures previously, and as long as you remember the year and procedure type, this can be an easy way to find a patient, because that name should show up in the list of patients under that procedure.  However, if you’ve been practicing long enough and taking enough pictures, this is not always easy.  Where I live, Charlotte NC, is a highly transient area, with lots of professionals moving into and out of town, so we tend to have high patient turnover rates.  In addition, we often have patients driving long distances for our unique combination of services, including LANAP Laser Periodontal TherapyTM, Six-Month Braces, and Cerec Same-Day Crowns, and those patients return to their regular family dentist after their treatment with us is complete.  It’s hard to remember patients we don’t see regularly, right?

Setting Up Your Smart Collections

When thinking of all the possible ways and combinations you could set up Smart Collections, the enormous possibilities can seem daunting.  Remember, though, you only need to do this for image sets that you really want to track over time.  This type of organization is very useful for dental lecturers and for anyone wanting to use your own photos in your marketing.  Theoretically, this might include sets as follows:

  • Dental Implants
    • Straumann
    • Implant Direct
    • Blue Sky Bio
  • Porcelain Veneers
  • Crowns
    • Lab-made
    • Cerec
  • Whitening
  • Six-Month Braces
  • Invisalign
For example, since I’ve started taking photos through my Leica M320 Dental Microscope, I use a Smart Collection based on the keyword “microscope” as an easy way to sort out those photos taken through the scope, rather than with the conventional DSLR set-up.
Smart Collections Save Time

If you’re anything like I am, with a dental photo catalog of nearly 65,000 images over the last 8 years, and you want to find photos of a given subject, without having to remember every patient name and sort through them all, Smart Collections are the way to go.  Because they  AUTOMATICALLY collect every photo in your catalog with the criteria you select, they’re a huge time-saver.

Learn to use Adobe Photoshop Lightroom Smart Collections, and you’ll make your life so much easier, any time you need to find one or more photos, but don’t remember the patient’s name, or if you want to find photos from a lot of patients of a certain procedure, material, etc.

Please let me know in the comments if you have any questions, or if you’ve found other easy ways to organize your photos!

Watermark Your Photos To Prevent Theft

June 29, 2012 by Charles Payet

In my last blog post about adding copyright information to your dental photos as a way to deter online theft of your work, the tutorial covered how to use a Metadata Template in Adobe Photoshop Lightroom to add identifying information to every photo.  This embedded information can be read by anyone who knows how to look; if they know, they may also know how to remove it (takes a little work), but a thief will probably move on to easier-to-steal photos instead of doing the extra work.  Another step you can take, also easy to do in Lightroom, is to add a Watermark, and that’s what this tutorial will cover.

Why Use a Watermark?

As seen in the example above, a watermark is typically a logo, symbol, or other mark that is placed somewhere on a photos that identifies it as belonging to someone, in this case, anyone seeing this photo knows that “Smiles by Payet” has copyrighted this image.  It’s pretty easy to see, and again, it may act as a deterrent to online theft, because anyone wanting to use it to represent their own work would have to laboriously edit the entire logo out of the photo.  Yes, I overdid it just a teensy little bit to make my point, and no, I would never ruin a photo to this extent with such tasteless work, but you get the point.

The tricky part in using a watermark, as you can probably see, has to do with 3 issues:

  1. Placement
  2. Size
  3. Opacity

While the point of a watermark is to protect your image, the point of your image is to showcase your work to existing or potential patients, with the goal that they will be impressed and call or schedule their treatment with you, not someone else.  Poor placement of a watermark can ruin the whole image and defeat the real purpose of the image, so please…..be tasteful about it.

Watermark Size, Placement, and Opacity

For maximum protection (my opinion only), I recommend creating a very large watermark that can be placed directly across the middle of the photo, but making it highly translucent, thereby not covering up what you want to show.  Doing so makes removal far more difficult for anyone wanting to steal your photo, unless they are highly skilled in Photoshop, and you generally can still see the photo well.

For the most tasteful protection, but the least effective, a small but fully opaque watermark can be placed in a corner.  It’s the least effective simply because it’s the easiest to remove, especially with the “Content-Aware Fill” and “Content-Aware Healing” tools available since Photoshop CS5 and now CS6, but if you don’t like the watermark obscuring the image, it’s still better than nothing.

Personally, I’m still experimenting on my own watermarks, and if you want some of my different tries, check out some photos on both my Charlotte dentist office website and my personal photography website:

Smiles by Payet Dentistry
CDPayet Photography

How to Create a Watermark in Lightroom

In Lightroom, you can create either a Text or Graphical Watermark; as a general rule, I suggest the Text Watermark for one main reason: it’s a LOT EASIER.  And here’s just how easy it is to create with 2 easy-to-understand screenshots.

Step 1: Go to the Edit option on the top menu, then scroll down to “Edit Watermarks”


Step 2: At the lower left is where you’ll type in the text for your watermark.  The easiest way to get that (C) symbol is to open MS Word, type in the left parenthesis – capital C – right parenthesis and it will automatically convert it for you.  Then just copy/paste it into the text box.


Step 3: Experiment!  Seriously!  You can see all the options on the right side – play around with them, see what you like, what you don’t like, and as you change things, you’ll see the preview change instantly.  Change the text color – font – size – opacity – placement, etc.

Step 4: Name Your Preset

And you’re done!


Coming up next – how to apply a watermark to your photos during the Export process.


Photosmith iPad App Syncs with Lightroom

May 1, 2011 by Charles Payet

Ever since the iPad was released, many apps have been developed for photographers, but none have had much real editing functionality, nor the ability to easily work with desktop photography software.  The Photosmith app is finally a real sign of change, and for dentists, this will be terrific.  With the Camera Connection Kit, here’s all you have to do:

  1. Take the pictures with your DSLR;
  2. Plug the camera into the iPad with the Camera Connection Kit
  3. Open the “Photos” app and import all the pictures (or just selected ones)
  4. Open (or switch to) the Photosmith for iPad app
  5. Show your patients
  6. Create folders, add color or star ratings, keyword tags, other info
  7. At the end of the day, sync all the pictures to Lightroom and it keeps all that info!

Press Release


Photosmith brings Lightroom synchronization to the iPad

Photosmith introduces sorting and tagging to photographers on the go

Atlanta, GA. April 26, 2011 – C Squared Enterprises, Inc has released Photosmith for the iPad. Photosmith brings the ability to manage photos using collections, keywords, tagging, ratings, EXIF, and IPTC metadata. Photographers no longer need to wait until they get back to their main computer or drag a laptop to sort through photos or show clients their latest results. With Photosmith, photographers can load their photos directly on the iPad, filter, sort, rate, and keyword while in the field/studio. When they get back to Adobe Lightroom on their Mac or PC they can sync all photos from the iPad to Lightroom and all of their tagging and rating will also transfer with no need to duplicate effort.

Photosmith improves the photographer’s digital workflow, especially flows with RAW images. Photosmith offers viewing of full RAW image data from the latest dSLR cameras in full fidelity and up to 100% zoom; even on 25+ megapixel images. Photosmith offers a grid view for quickly sorting through thumbnails and collections, a loupe view for viewing individual images and tagging, and a full screen view to maximize use of the screen. Users can assign a rating, choose a color label, view the basic EXIF data (shutter speed, ISO, f/stop, and more), or edit the title, caption, or a number of other IPTC fields. All these settings are synchronized with Lightroom using the free Photosmith plugin. Future changes made in Lightroom are saved back to the iPad during a sync as well. See more at: http://bit.ly/PhotosmithTour

Photosmith assists photographers on the go with sharing their photos too. Photos can be sent to Flickr, Facebook, Dropbox, or email. Those sent to Flickr and Facebook maintain their titles and keywords, allowing pros to quickly share and get feedback from their clients, or allows the causal photographer to share photos while on vacation.

Photosmith is the culmination of 24 months of effort and development continues to add new features over time. Users are encouraged to submit feedback and suggestions to help drive the future of the app.
The app is available worldwide for US$17.99 (or the approximate equivalent).

For more information please visit http://www.photosmithapp.com

Adobe Lightroom Export Plugin to Facebook Fan Pages

March 19, 2011 by Charles Payet

For a long time, one small barrier has kept me from uploading a lot more photos to my office Facebook Fan Page: Facebook.com/TheCharlotteDentist, and that is the simple fact that Lightroom did not have the ability to upload directly (no Publish Service) to Fan Pages — only to Personal Pages.  I had to export the pictures from Lightroom to another folder, THEN go to Facebook and upload them from there.  Not that it is a lot of work, but it required more steps than how easily I can Publish photos to my SmugMug photography site, CDPayetPhotography.com, where I have photo galleries of 6MonthSmiles Invisible Adult Braces patients, porcelain veneer before/after pictures, and more.

Jeffrey Friedl’s Lightroom Plugin Exports Directly to Fan Page Albums

Well, tonight (March 20th, 2011) I was researching some material to put in my upcoming Townie Meeting 2011 lecture on dental digital photography workflow, and through various roundabout ways, I ended up back on the blog of Jeffrey Friedl, who has been creating and updating highly functional Adobe Lightroom plugins for as long as Lightroom has been around.  And I happened to read this very exciting statement:

Note: as of version 20110116.147, the plugin can upload to albums on fan/group pages.

Dentists can easily export pictures to the office Fan Page with this Adobe Lightroom plugin.Needless to say, I immediately downloaded the new plugin and registered it (it’s Donationware, which means it is “almost” free, which means all you have to do is pay the minimum 1 US penny via PayPal for unlimited registration/use of the plugin) with a $20 donation.  With just a minute needed to authenticate to Facebook, suddenly I had the easiest way possible to send all the pictures I could want directly to Facebook and even keep track of them within Lightroom.  You can even set it up for multiple Fan Pages, as I’ve shown here.

I highly recommend Adobe Photoshop Lightroom for dentists, and with this Facebook plugin, it became an even better option, given how important Social Media is becoming in promoting our dental practices.

How Many Ways Does Lightroom Let You Use Your Pictures?

February 12, 2011 by Charles Payet

As I’ve discussed, if you can’t actually DO something with your pictures, then they become nothing more than nice documentation for yourself, possibly insurance, or possibly to defend yourself against lawsuits or Board complaints.  The real power of pictures, though, is in their ability to educate and motivate patients, whether in your office or out.  And this is where I find Adobe Photoshop Lightroom so helpful.  Just check out the list of ways you can output images from Lightroom (using my own example websites, social media, etc.):

social media photo publishing and sharing options within Adobe LightroomSocial Media Photo Sharing Options

While there is unfortunately no way to upload photos from Lightroom to Facebook Fan Pages (serious bummer, but you can work around it), you can set up Publishing Services for other social media sites, such as

  • Flickr
  • Smugmug (where I host my professional photography site)
  • Google Picasa albums (which you can link to your Google Places page)

This allows you to select a group of pictures and batch upload them with a single click.

Create Patient Slideshows, Custom Print Layouts, & Web Galleries

There is one feature that Lightroom currently lacks, and that is the ability to design photobooks directly within the software, and this is certainly something that would be terrific for dentists.  Aperture 3 and iPhoto, both by Apple, do have this capability built in; something we’ll hope for in future versions of Lightroom.  If you are an Adobe user, Photoshop Elements 9 has this capability.

However, in most popular programs now, you can select a group of photos and have them merged into a MPEG4 video, including music and captions, even a voice over explanation if you want to take the time.  You can create custom layouts for ortho, for lab communication, and printed pages to put in a 3-ring binder as an alternative to a printed photobook, and more.  And you can

  • Go to page 1
  • Go to page 2
  • Go to Next Page »

Copyright © 2025 · Atmosphere Pro on Genesis Framework · WordPress · Log in


Loading Comments...