• Skip to main content

Digital Dental Photography

Digital Photography and Workflow for Dentists

  • Home
  • Gear
    • Accessories
  • Clinical Dental Photography
    • Basic Settings
    • Patient and Camera Positions
    • Quadrants and Occlusals
    • Extraoral Photos
  • Software
    • Photo Organization
  • Portrait Photography Basics
  • Dental Websites
    • WordPress Websites
  • CE Reviews

Intraoral Photography

Show Your Patient the Problem with Pictures

February 15, 2011 by Charles Payet

If you already use digital photography, you probably know how much easier it is to communicate with patients using pictures of their own teeth.  Today was a perfect example of why you should be doing this, and then how you can turn that into communication with your entire patient base!

A Cracked Tooth but No Pain & the Patient Doesn’t Believe You

Ever had this happen before?  You start prepping a simple DO composite on a molar or premolar due to some interproximal decay you saw on a bitewing, and maybe you’re replacing an existing amalgam or composite, and suddenly you’re staring at a crack that runs the entire mesio-distal width of the tooth, and you have to tell the patient s/he needs a crown.

Even better, the patient has had absolutely no symptoms, and maybe is a new patient whom you know to have had a bad experience with their last dentist and who didn’t want to fix something that wasn’t causing any symptoms.

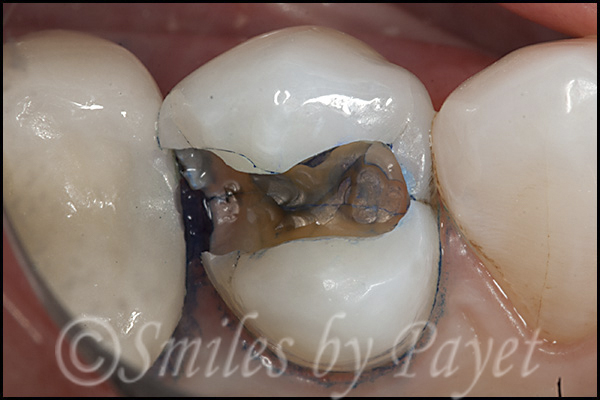
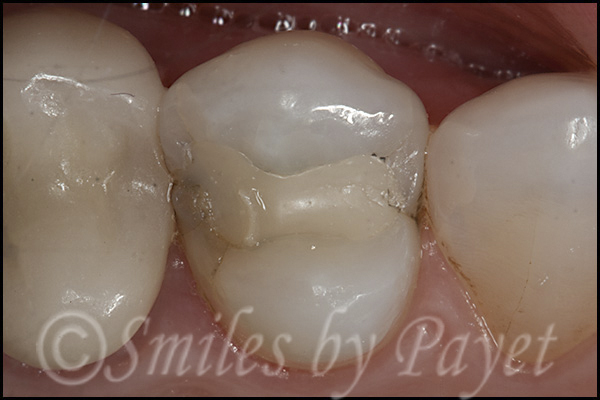
I was fortunate that this (kinda) scenario happened with a long-time patient today, and so I didn’t have to deal with any of the issues in the second paragraph, but just take a look at the photos:

Preop, I knew there were at least some craze lines both mesially and distally, but would you have thought these were really that bad?  Even with my Zeiss PICO microscope at 8.8x magnification, I was anticipating a simple DO, maybe MOD composite.

OOPS!  This was NOT what I expected, although we’ve all seen it plenty of times.

So I questioned her again, and she repeated that she had had NO symptoms, which is really a good thing, of course, but a bit surprising.

Without a Picture, How Do You Communicate with Patients?

At work, I still use a Canon Digital Rebel XTi, which is probably 2.5 years old, and the screen isn’t very big.  Nevertheless, I just zoomed in and showed the patient this picture, explaining that the blue dye was highlighting the crack so she could see it well.  Do you think she had any hesitation in accepting the need for a crown instead of a filling?  Nope!

Blogging, Email Blasts, & the iPad for Patient Education

OK, so this patient quickly understood (literally about 10 seconds) why she needed a crown (nearly $1200 in my practice) instead of a 3-surface composite (about $295-ish).  But what if you’d like to show a lot of patients this?

  • I’ve already written a blog post about this topic: Why Does a Tooth with a Small Filling Need a Crown?
  • Tomorrow I will send out an email blast through Constant Contact or Mail Chimp (I’m still experimenting with which one I like) to my entire patient base, alerting them to this important information.
  • The blog post will automatically feed into my Facebook Fan Page for The Charlotte Dentist
  • I will also load these photos into the “Cracked Tooth” demonstration for the DDS GP YES! app for my iPad so my staff can show patients with similar situations these photos; do you think they’ll have any more difficulty understanding than my patient today did?
  • Next I can upload these photos to my Flickr account, Picasa Web Albums, or more — with the right alt text tags and links back to my Charlotte dental practice website, I can build my web presence and SERPs.  Heck — did you notice that, in this one blog post, I just created 3 links back to my website?  Over time, these links add authority and “link juice” to boost my rankings!

A Ring Flash Technique for Tooth Shade Matching

January 10, 2011 by Charles Payet

In response to a question on DentalTown regarding how to get rid of the excessive flash on the central incisors when taking a shade for lab restorations, my colleague Dr. David Cook responded with this trick to solve the problem.  The description and photos are both courtesy of him.

One solution when you get too much perpendicular flash returning directly towards your lens is to alter the angle of your lens to the flat facial surfaces as others have advised.

Another solution is to still shoot perpendicular to the flat facial surfaces, but remove the ring flash from the front of your lens, hold it on top of your lens and angle it down 30-45 degrees. The flash is the same distance from the teeth, but the light angling down will not give you as much reflective washed out areas.

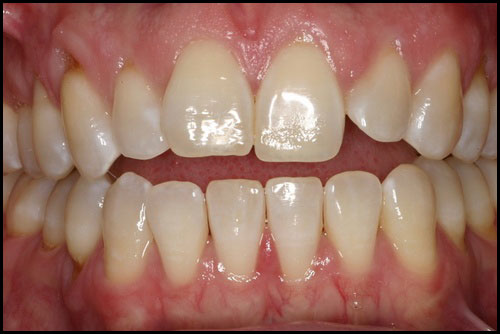
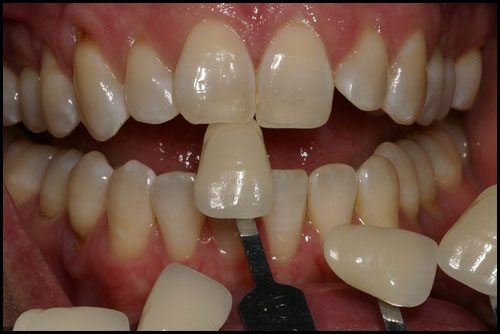
This image, the lens is perpendicular to the flat facial surface and the attached flash is perpendicular. Note the large reflected washed out facial areas on the centrals.


This image, the lens is still perpendicular, but I removed the ring flash, held it above the lens and angled it down 30-45 degrees. There are still highlights, but not the large washed out areas. You can also see the incisal translucency better and characterizations when the flash is taken off and angled down.

As others pointed out, another option is to use a twin-lite flash, such as the Canon MT-24EX TTL Macro Twin Lite or the Nikon R1C1 Wireless Closeup Speedlight system.  These are generally more difficult to use for anything except the anterior teeth unless you are very experienced.

8 Uses for Dental Photography

December 29, 2010 by Charles Payet

Patients often ask why we take photos, and especially why we take so many.  So for a quick summary of why you, as a dentist, should use digital photography in your practice, here you go:

1. Dental Insurance – it’s hard for an insurance adjuster to deny a claim of a tooth with a big hole in it from doing the endo, or showing the huge cavity, etc.

2. Case Presentation – whether using the iPad, PowerPoint, or whatever, you want an easy way to show patients what is going on in their mouths, whether it’s a single cracked tooth, periodontitis, bruxism, etc.

3. Diagnosis – it is IMO impossible to properly diagnose and treatment plan complex cases without good photography.

4. CYA – it’s unfortunate that I had to do so, but I have avoided several problems with the NC Board regarding patient complaints because I had a case thoroughly documented start-to-finish, thereby eliminating the patient’s ability to say I did poor dentistry.

5. Tracking Your Work Over Time – with keyword tagging, you can label your pictures and later do searches based on them to follow the success (hopefully!) of your treatment over years and decades.

6. Self-Improvement – it’s kind of tough to hide from yourself when the pictures are on a 24″ HD monitor or bigger.  Pictures don’t lie, and I know that I am motivated to do better when I take a picture and find some fault (however nitpicky) that I didn’t see before dismissing the patient.

7. Lab Communication – it’s a LOT easier to communicate with a lab about shade, contour, etc. using high-quality photographs than trying to draw it out on paper.

8. Showcase Your Work to Patients – it’s far more effective to show patients considering some treatment photos of YOUR work than of someone else’s, especially on the Web.

Important adapter for new Canon 100mm Macro

December 27, 2010 by Charles Payet

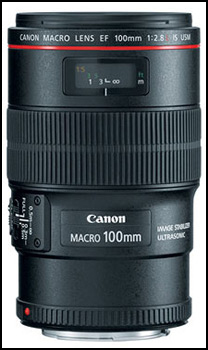
I confess, I did not bother learning much about the new Canon 100mm f/2.8L IS macro lens that was introduced early in 2010 due to the significantly greater cost and the minimal increase in usefulness for dental macro photography.

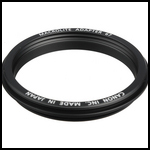
Recently, however, I learned from Mike McKenna at Photomed.net, that the new 100mm macro does NOT have the little “lip” at the end to allow the Canon MR14-EX ring flash or the Canon MT-24EX Twin Lite flash to be added.  Why?  I have no idea, as such flashes are an integral part of many macro photographer’s gear.  In fact, I think it’s pretty stupid, but hey, I guess it’s just another way for Canon to squeeze a few more dollars out of you, because now you have to buy the Macrolite 67 adapter (see below) for another $32 or so if you do choose to buy the new version of the 100mm macro.

2 Extremely Useful Websites for Learning Digital Photography and Editing Software

February 14, 2010 by Charles Payet

Along the lines of my last post on recommended software for dentists to use for managing, cataloging, and editing their pictures, there are a couple websites that I have found extremely useful and well-done, because they both have enormous selections of online video tutorials:

Lynda.com 

KelbyTraining.com

Figured I ought to mention both of those.  🙂  Each does have a very reasonable subscription fee, whether you choose to sign up for a monthly or annual subscription.

RAW or JPEG for dental photography?

December 31, 2009 by Charles Payet

Here’s another thought that popped to mind this evening as I was playing with my new Canon 7D (oh god, how I love this thing already!), and it relates to 2 questions many colleagues ask:

1) Should I shoot in RAW or JPEG?
Simple answer to a complex question: UNLESS you are taking pictures that you need in RAW because you’re aiming for accreditation with the American Academy of Cosmetic Dentistry or a similar organization, I recommend you shoot in JPEG.  Why?  Well, there are no PMS (practice management software) programs of which I know that can handle RAW files; you need much bigger memory cards if taking a lot of pictures; RAW files do take longer to download; you need a lot more HD memory to store a large number of RAW files.  As a comparison:
     My work PC has roughly 44,000 pictures of patients that I’ve taken with all my digital cameras going back to 2002 (my first was an Olympus C2500L), and the My Pictures folder is approx. 130GB.  My home PC has approximately 20,000 pictures in the My Pictures folder, but because I shoot all my personal stuff in RAW, that folder is about 300GB!  So only 1/2 the pictures, but more than double the memory required.  And with the new 7D having RAW files of about 24MB each, that will increase fast!

While JPEG files do degrade slightly over time when opened and closed many many many times, with the current resolution of images, the likelihood that such degradation will be visible in your entire lifetime is practically zilch.  Ain’t gonna happen.  No need to worry about it.

If you ARE aiming for accreditation, why is it therefore important to shoot in RAW?  For a very simple reason: the RAW file is equivalent to a digital negative, and it is ALWAYS that equivalent.  Even if you edit it, the original is always there and can be recovered, so it’s impossible to “fake” pictures by editing them.  That way the examiners can be 100% positive that no-one is trying to sneak something by that was really Photoshopped.

2) OK, so I shoot in JPEG for intraoral/extraoral photography, what level of resolution should I choose?
Since JPEGs can be handled pretty easily by virtually any computer these days, and you can get a lot more pictures onto a card and HD, it makes sense IMO to shoot at the largest resolution (the “L” with the smooth curve next to it, not the steps).   Sure, you could shoot much smaller files, but what’s the point?  At some time you will probably regret having a lower-quality image that you can’t improve/upsize……but it’s easy and fast to take a bigger-than needed picture and downsize it.

Copyright © 2025 · Atmosphere Pro on Genesis Framework · WordPress · Log in


Loading Comments...