• Skip to main content

Digital Dental Photography

Digital Photography and Workflow for Dentists

  • Home
  • Gear
    • Accessories
  • Clinical Dental Photography
    • Basic Settings
    • Patient and Camera Positions
    • Quadrants and Occlusals
    • Extraoral Photos
  • Software
    • Photo Organization
  • Portrait Photography Basics
  • Dental Websites
    • WordPress Websites
  • CE Reviews

Before and After Pictures

Need Creative Images but Don’t Know Photoshop?

August 24, 2014 by Charles Payet

canva icon

As much as I love Photoshop and have been using it since version CS2, and even with the awesome Photographers Bundle of Photoshop + Lightroom for only $9.99 that Adobe has now made available indefinitely, I recognize that many people simply don’t want to learn how to use it.  And while I am a huge proponent of all that Lightroom can do for organizing, editing, and presenting photos, for many doctors or team members, even that may be too daunting a challenge.  It shouldn’t be, but it is.  So what do you do?  What even I’m doing a lot nowadays: www.Canva.com

Easy Way to Create Attractive Online Images

Here is a selection of images created with Canva just to give you an idea of what can be done (BTW – please remember that all of these images are ©Smiles by Payet and may NOT be used in any way without permission):

How Many Options Does Canva Offer?

Here’s a simplified list of the current pre-formatted (sizes only) options offered on Canva:

  • Twitter post (1024px x 512px)
  • Twitter cover image (1500px x 500px)
  • Facebook ad (1200px x 627px)
  • Facebook cover image (851px x 315px)
  • Google+ cover image (1240px x 700px)
  • Social media image (800px x 800px)
  • Blog image (800px x 1200px)
  • Pinterest (735px x 1232px)

And of course, you can always create and save a Custom set of dimensions for your own use.

How Much Does Canva Cost?

While it can’t compare to Photoshop in many ways, and even though the PS+LR package is ridiculously affordable, I have to admit – Canva is even MORE affordable, for the simple reason that it’s FREE!  Yes, you read that correctly – FREE (ok, with a one small caveat).

To sign up for an account costs you absolutely nothing, and if you like, you can instantly create an account by signing in with either your Facebook or Twitter accounts.  Supposedly, a Google+ sign-in is also on the way, but hasn’t arrived yet.  They have a ton of easy-to-use and attractive backgrounds, icons, arrows, etc. and text options that are completely free, and you can upload your own images to use in your creations, too, and as long as you do that…FREE!

So let’s say you don’t have an image for your topic, and you happen to see that Canva has one you like…..are they ALL free?  No, they’re not.  But for all of their non-free images, each one only costs $1.  Yup.  ONE-FREAKING-DOLLAR-EACH.  How sweet is that?  So far, because I like using all my own photos, the only stuff I usually use from Canva is free.  In fact, I put a $20 credit on my account 2 months ago because I did want a few images, but I haven’t even used 1/2 of my credit yet, and I’m approaching 50 images created in Canva.

How Easy Is It to Learn?

This is the best part of Canva compared to PS or LR: it’s all drag’n’drop.  If you want to drag things around and line them up – when they line up you’ll see dashed lines connecting just which elements are lined up so you can see exactly.  How about resizing?  Just click on an image or text and the little corner/side handles appear for you to grab and resize as easily as you want.  Text?  Of course!  Pick any color from the color picker.  Outlines and shapes?  Pick from a wide variety of pre-formatted ones that can be reformatted as you like.  Upload your own images?  Easy as can be.  Layer text on top of images?  Sure!  Share directly to Twitter or Facebook, even with embedded links?  Absolutely!  (Still waiting for them to get a direct to Google+ sharing button).  Download to your own computer?  Couple of clicks and it’s done.  Create one image and then create duplicates for similarly-themed images?  Of course.  The following screenshot will give you a few ideas:
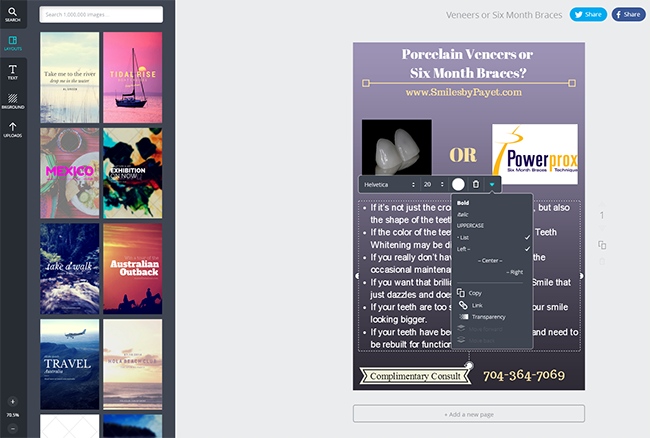
Canva screenshot


Of course, if you are proficient at Photoshop, you’ll instantly recognize that Photoshop has capabilities far beyond Canva, and it’s not like this will suddenly turn you into a professional graphic designer.  However, you don’t have to be!  You can create pleasing, attractive images and infographics quickly and easily for your website, social media, and even print if you like, and it’s fast, easy, and affordable, and honestly, it’s far more important to have something pretty good that is regularly in front of potential patients, than it is to wait and spend on perfection.


Photoshop Tip for Dentists – Remove Facial Hair and Skin Blemishes

February 13, 2013 by Charles Payet

While I do not believe it is ethical for dentists to use Adobe Photoshop to alter the appearance of their work, thus deceiving potential patients about what they can really offer, there are certain circumstances under which I believe it is not only acceptable to use Photoshop, but it may be absolutely necessary to do so.  Bear in mind – I NEVER condone the use of Photoshop to actually change anything about the treatment you provided for a patient – but AROUND your work it may be just fine.  In the following video tutorial for dentists on using Photoshop, I will demonstrate 2 techniques that you may find useful, which your patients will love, and which will enhance your photos for marketing purposes.

Use Photoshop to Remove Facial Hair

If you’ve done enough cosmetic dentistry and Before/After portraits, especially of women, you will almost certainly hear one or both of the following comments, which will always start off the same way:  “Of course you can put my portrait on the wall or your website, doctor, as long as you…..

  1. ….just get rid of all those wrinkles!” OR
  2. ….as long as you get rid of those moles/facial hair/sun spots!”

It doesn’t matter if the woman is 26 years old and the only wrinkles are in her imagination, if she sees her photo on your wall, website, Facebook page, etc. and hates it, you will never hear the end of it. Of course you should use a solid Photo Consent Form, but I always let a woman proof her final photo before I print it or put it on the wall; why take a chance?  Guys usually couldn’t care less, and let’s be clear….these tips should only be used for womens’ portraits 99% of the time unless a man specifically requests something.  

Photoshop Elements 11 or Photoshop CS6 ?

The video tutorial to follow is done in Photoshop CS6, and I’ve been using the full version of Photoshop (PS) since version CS2; prior to that, I used Photoshop Elements.  The current version of  Elements (PSE) is version 11, and it is a pretty powerful and very affordable program if you don’t want to spend the money on Photoshop, and you should be able to do these edits in PSE, too.  I just personally prefer the full version.  I find that Photoshop Lightroom (LR) is more intuitive program to learn, as everything is laid out more easily.

How to Reduce or Eliminate Unwanted Facial Hair, Sun Spots, and Moles

There are only 2 tools you will need for this exercise:

  • Duplicate Layer
  • Clone Tool on “Lighten” Mode or “Darken” Mode


DDS GP: The iPad “Killer App” for Dentists

January 11, 2011 by Charles Payet

Do you have an iPad?  If not, WHY NOT!?!?!?  😀

We got our iPad right after it came out in 2010, and I must say, it has essentially replaced my laptop for any time I need a computer but am not sitting at my desk.  There’s a darn good reason Oprah named it one of her Ultimate Favorite Things.

But for dentists, IMO, there is now a completely different reason for the iPad to become one of YOUR ultimate favorite things, and that is one particular app:  DDS GP.

Use Your Own Photos to Educate Your Dental Patients

One of the best features of this app, is the ability to add your own patient photos to individual presentations.  All you have to do is create a folder of pictures to sync to the iPad, and from within the app, select the photos to add to each presentation, with no limit.  So add Before/After Portraits — composites, amalgams, CERECs, and more!  Then put the iPad in your patients’ hands and simply WOW them!

%CODE1%

Customizable, Portable, & Easy-to-Learn for Dentists and Dental Teams

The DDS GP app currently has more than 200 different presentations, and more are being added regularly.  They include such procedures and diagnoses as:

  • Bleaching: In Office
  • Bone Graft with Extraction
  • Bridge: Porcelain, Anterior
  • Crown-Lengthening
  • Brushing: Bass Technique
  • Cracked Tooth, Cusp
  • Crown: CEREC
  • Invisalign
  • Nightguard: NTI
  • Veneer, Single: Porcelain, Lab

Affordable Dental Case Presentation Software vs. CASEY or GURU

Unlike Patterson Dental’s CASEY (which can run up to $8000) or Henry-Schein’s GURU (not sure, but I have heard about $2000?), DDS GP is truly affordable — only $399! No, I am not kidding, AND that includes free lifetime updates! No, I am not kidding about that, either.

Email Treatment Plans, Add Fees, Include the Presentations, & More

From directly within the app, you can create treatment plans and add presentations from the app, then send it right to your patient via email, or if you have a compatible printer, print it directly from your iPad.  This makes it easy for husbands or wives to show their spouses the same, easy-to-understand presentations that helped them make the decision to move forward on treatment.

2011 and LOTS of New Info Coming!

January 3, 2011 by Charles Payet

Happy New Year!  😀

I just want to say that I am very excited about this coming year and what will be added here for your use.  Since I will be lecturing on an effective digital photography workflow for dentists, that will be the primary focus for the next 4 months.  As a person with ADD, blogging is a great way of helping me refine my thought processes and the workflow itself as I put them into a format that should be easily usable for you, my colleagues.

Here’s a little of what you can expect:

  1. Video tutorials
  2. Portrait photography tips and settings
  3. How to use your photos in Social Media
  4. Creating website galleries and building online photo galleries
  5. Creating MP4 videos for your office and websites

While there is such a huge wealth of information to present, my goal is to make this stuff EASY for you, so you don’t have to go through the same learning curve I did.  😉

Where Do You Get Dental Website Photos?

December 30, 2010 by Charles Payet

A Townie friend of mine, Lisa Weber of ProductionFinder.com, recently related this story that emphasizes 3 extremely important points:

  1. Be sure that your website photos are legitimate,
  2. Why you should use your OWN photos on your website, and
  3. Take the appropriate steps to protect your photos.

I’ll be posting more on how to get your own photos onto your website in an attractive format, as well as on how to protect your photos (within limits) in upcoming blog posts.

And now, in Lisa’s own words:

I thought I’d post a recent situation because my guess is it’s more common than you might think. This will be long so bear with me.  This is what happened recently:

Client emailed me to inquire about my services and we agreed to talk by phone the following day.  I checked out the name online to see where the practice was and take a tour of the website.  A website can tell me quite a bit about a practice, so I usually pop into all of the pages.  I looked at the Smile Gallery and saw some very familiar smiles.

The images (all of them) were images I’d actually participated in taking in a practice I used to work in, and now work for on a consulting basis.  I knew the names associated with those smiles.  What are the chances of my stumbling on those images?  Pretty darn close to nil.  Before assigning blame to the dentist, I decided to check out the web designer.  I found 5 websites for dentists in that same area of Arizona using the exact same images.  There were a few additional images on several of them but the galleries were virtually identical.  That’s when I assumed the dentists were under the impression they were stock images and the web designer had been the one who had likely just copied and pasted them.  They were all small images, saved as jpegs with the different practices names,  numbered sequentially.

I saved an archived version of all the sites in question prior to doing anything and then called the web designer.  I was unable to get a person, so left a message and also sent an email.  I then began to contact their clients and tell them what the situation was, explaining that our assumption was that they had no idea those images weren’t available for use.  Each of the offices were able to get the images removed from their sites.  I searched again and found yet another dental website using them and contacted that practice last night.  Speaking with an incredible OM, I explained the history and that my only purpose is to get the images removed and we do not hold the dentist responsible at this time.  I explained that the web designer had placed her doctor in a very precarious position because ultimately it was his liability.  I recommended they pull out the original contract to see if the web designer represented that he had all rights to the images he was going to use.

After receiving my message that if I didn’t receive a call by close of business, I would rely on our attorney to make any future communications, I received a call from the sales person from the Web designer.  He stated that although he believed he got all the images from a Lumineer site, he would go ahead and remove them.  He said his business was no longer in operation, regardless.  I asked him if his clients knew this and he assured me that they did.  I mentioned that I had spoken with several dentists in the past week who would be very surprised that they were no longer in business.  I also mentioned that not only were the images not from a Lumineer site, but none of them displayed a Lumineer, since that is a product that neither doctor has ever used.  He seemed to feel it might be possible they were not the images I felt they were until I indicated that by “participating” in the photography, I meant I was actually in the room when those images were taken, cropped them and have them saved on flash drives along with a few thousand other images that I have been recently viewing for inclusion in the new website once it goes live.   Those Before and After images being shown in Arizona were born and raised in Middleburg Virginia.

Not only did this web designer copy and paste the images (from an outdated website) but they used the identical images in a competitive market for offices that were geographically close to each other!  One image in particular really ticked me off because it was probably the most beautiful after pic I have ever seen of an implant crown on a central after months of tissue development and a dead-on perfect shade and characterization match by the ceramist.  Those aren’t easy to do and was a testament to that particular dentist’s skill.   That after pic should have been earned, not copied and pasted.

So…..very long story….but…..I would strongly recommend that you verify that images used in your website (all of them) have clear records of having been obtained for your use, either by you or by your webdesigner.  This is likely going to be a bigger problem very quickly, and it’s only a matter of time till people run into a dentist who isn’t as reasonable as the one I worked for.  I feel like a detective this week, but I’m glad I stumbled on those pics, that’s for certain. I think the doctor that first contacted me is glad I did as well.

I, for one, am grateful that there are people like Lisa out there, who will do the right thing by both the dentists who were ripped off by their web designer, as well as by the dentist to whom the patients and photos belong.  Who knows how far those photos might have spread, were it not for Lisa’s vigilance.

8 Uses for Dental Photography

December 29, 2010 by Charles Payet

Patients often ask why we take photos, and especially why we take so many.  So for a quick summary of why you, as a dentist, should use digital photography in your practice, here you go:

1. Dental Insurance – it’s hard for an insurance adjuster to deny a claim of a tooth with a big hole in it from doing the endo, or showing the huge cavity, etc.

2. Case Presentation – whether using the iPad, PowerPoint, or whatever, you want an easy way to show patients what is going on in their mouths, whether it’s a single cracked tooth, periodontitis, bruxism, etc.

3. Diagnosis – it is IMO impossible to properly diagnose and treatment plan complex cases without good photography.

4. CYA – it’s unfortunate that I had to do so, but I have avoided several problems with the NC Board regarding patient complaints because I had a case thoroughly documented start-to-finish, thereby eliminating the patient’s ability to say I did poor dentistry.

5. Tracking Your Work Over Time – with keyword tagging, you can label your pictures and later do searches based on them to follow the success (hopefully!) of your treatment over years and decades.

6. Self-Improvement – it’s kind of tough to hide from yourself when the pictures are on a 24″ HD monitor or bigger.  Pictures don’t lie, and I know that I am motivated to do better when I take a picture and find some fault (however nitpicky) that I didn’t see before dismissing the patient.

7. Lab Communication – it’s a LOT easier to communicate with a lab about shade, contour, etc. using high-quality photographs than trying to draw it out on paper.

8. Showcase Your Work to Patients – it’s far more effective to show patients considering some treatment photos of YOUR work than of someone else’s, especially on the Web.

Copyright © 2023 · Atmosphere Pro on Genesis Framework · WordPress · Log in


Loading Comments...